XMCOSY+ String Lights, Revisited: No Node-RED and One Package to Copy
Table of Contents
Four years after getting my XMCOSY+ string lights running locally with LocalTuya, the Node-RED flow is gone, the light speaks kelvin again, and the whole thing fits in one Home Assistant package you can drop into your own config. Part 2 of 2 in Local XMCOSY+ String Lights. Back in 2022 I wrote about getting my XMCOSY+ string lights working locally with LocalTuya. It worked, but it took a lot of pieces: a LocalTuya light, five sensors, a template light, three scripts, an automation, two dropdown helpers, two more template sensors, a REST command, and a Node-RED flow whose only job was to convert between the different ways of measuring brightness and color. Despite how hacky it is to integrate these lights, they have been rock solid for me over the past several years. They hang in my basement these days, and everything still runs locally. But my own setup slowly drifted over those years: a fix here, a workaround after a Home Assistant update there, and none of it made it back to the blog. While I was cleaning up my Home Assistant config with Claude this month, the string lights got a turn too, and I wanted to make sure those improvements were available to everyone, not just my basement. So this post is two things: what changed, and a single package file you can drop into your own Home Assistant. Node-RED is gone. In color mode, the brightness lives inside data point 24, next to the color, and the lights, Home Assistant and I all measured brightness and hue on different scales. Back then I needed Node-RED to convert between them. Home Assistant has since gained the ability to do that conversion itself, so now I just hand the LocalTuya light the current color along with the new brightness, and the DP 24 string gets built for me. The Node-RED flow, the REST command and Home Assistant only speaks kelvin now. Home Assistant 2026.3 removed the old mired-based color temperature from lights. LocalTuya 5.2.3, the version I run, still works in mireds, so white temperature stopped working on every LocalTuya light. The fix here is to skip LocalTuya for that one setting and write the white temperature data point (23) directly. Much shorter templates. The template light moved to the modern Dropdowns that tell the truth. The scenes got their own dropdown (a template One file. Everything that isn't LocalTuya itself is now a single package, with the device ID in one place. If you read the first post, skip ahead. Here's what the lights report: And what they look like (this is from the 2022 post): DP 24 is 14 hex characters. The first six are the color as a normal hex code ( DP 101 ends with the two "Pick 2" colors as hex codes, one after the other ( The scenes, in the names the package uses: Install LocalTuya (it's in HACS) and add the lights, following its README to get the device's local key. Then add these entities to the device. The entity IDs matter: the package looks for exactly these names, so rename them in Home Assistant if LocalTuya picks something else. The light: a Five sensors, one per data point, so the templates can read them: The only new one compared to 2022 is DP 23. It lets the light show its real white temperature again, which my own setup has been missing since the kelvin change. If you don't use packages yet, add this to Then save the file below as Brightness. The lights have two brightness settings: DP 22 for white, and the end of DP 24 for color. Effects always run at full brightness. So White temperature. Home Assistant sends kelvin, and the lights want 0-255 on DP 23. Pick 2 colors. Each dropdown's state comes straight from DP 101, so if someone changes the colors in another app, the dropdowns follow (as long as it's one of the 16 colors in the list; otherwise it shows as unknown). Picking a color writes DP 101 with the new color in its slot and the other one unchanged. To offer more colors, add them to both lookup tables and the One place for the device ID. Every write goes through In my house the lights also run on an automation: they come on with the basement's main lights during the day, and go off at 10 pm or after the basement has been empty for 30 minutes. That part is specific to my house, so it isn't in the package. Affiliate Link: XMCOSY+ Outdoor String Lights, 49Ft Non-Affiliate Link: XMCOSY+ Outdoor String Lights, 49Ft That is the end of the series. Previously: Integrating XMCOSY+ Outdoor String Lights with Home Assistant Locally What Changed Since 2022
sensor.color_output all went away.template: syntax, and the long if / elif chains that translated scene names and colors became small lookup tables.select), which matters for dashboards and Google Home, since neither can pick a light "effect". The two "Pick 2" colors are dropdowns that read their value back from the lights, so they can't drift out of sync with what's actually showing. A Quick Recap of the Data Points
DP What it is 20 On / off 21 Mode: white, colour, or scene1 to scene922 Brightness in white mode (25-255) 23 White temperature, 0 (2700 K, warm) to 255 (6500 K, cool) 24 Color and color brightness 101 The two "Pick 2" colors {
"20": false,
"21": "white",
"22": 255,
"23": 165,
"24": "23eb230159ff38",
"101": "ffff0502808080ffff00"
}23eb23), then a 0, then the same color as hue (3 characters, 0-360: 159), saturation (2 characters, 0-255: ff) and brightness (2 characters, 0-255: 38).808080 and ffff00). I still don't know what the ffff0502 at the start means, so the package keeps whatever the lights send and only changes the last 12 characters.scene1 Strobe, scene2 Fade, scene3 Pulse, scene4 Blink, scene5 Chase, scene6 Christmas, scene7 America, scene8 Pick 2 (the only one you can customize) and scene9 Multi. Step 1: LocalTuya
light on DP 20, entity ID light.xmcosy_localtuya, with: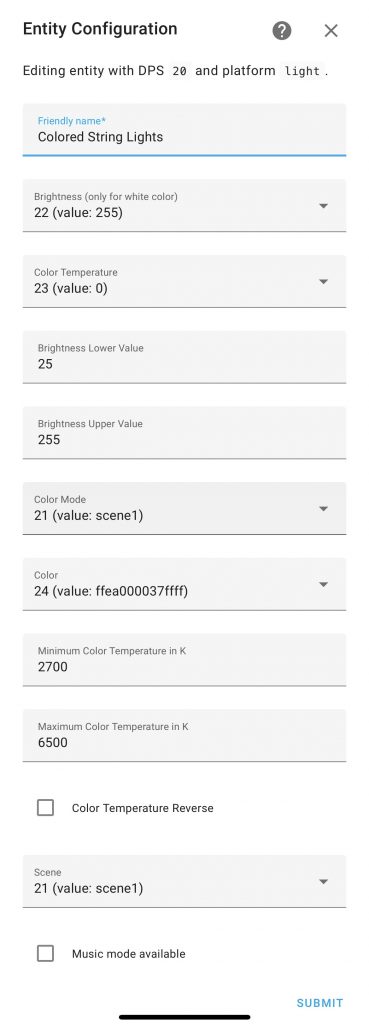 The same light settings as in 2022
Entity ID DP sensor.xmcosy_mode21 sensor.xmcosy_white_brightness22 sensor.xmcosy_white_temp23 sensor.xmcosy_color24 sensor.xmcosy_pick2_colors101 Step 2: The Package
configuration.yaml:homeassistant:
packages: !include_dir_named packagespackages/xmcosy_string_lights.yaml, put your Tuya device ID (the same one you gave LocalTuya) on the one line marked for it, and restart Home Assistant.# XMCOSY+ string lights, fully local through LocalTuya.
#
# Before using this file, add the lights in LocalTuya and give these six
# entities exactly these entity IDs (LocalTuya lets you rename them):
# light.xmcosy_localtuya the LocalTuya light (DP 20)
# sensor.xmcosy_mode DP 21: white, colour, scene1 ... scene9
# sensor.xmcosy_white_brightness DP 22: brightness in white mode (25-255)
# sensor.xmcosy_white_temp DP 23: white temperature (0 = 2700 K, 255 = 6500 K)
# sensor.xmcosy_color DP 24: colour and colour brightness
# sensor.xmcosy_pick2_colors DP 101: the two "Pick 2" colours
# Then put your Tuya device ID in script.xmcosy_set_dp below. That's all.
#
# You get: light.string_lights (on/off, brightness, white temperature, colour,
# effects), select.string_lights_scene, and select.string_lights_color_1 / _2.
script:
# Every write to the lights goes through here, so the device ID lives in one place.
xmcosy_set_dp:
alias: "XMCOSY: set a data point"
mode: parallel
fields:
dp:
description: Tuya data point number
value:
description: The value to write
sequence:
- action: localtuya.set_dp
data:
device_id: YOUR_TUYA_DEVICE_ID # <-- the only line you have to change
dp: "{{ dp }}"
value: "{{ value }}"
# Brightness: white mode has its own DP (22). In colour mode the brightness
# is the last two characters of DP 24, so we hand the current colour back to
# the LocalTuya light with the new brightness and let LocalTuya build DP 24.
xmcosy_brightness:
alias: "XMCOSY: set brightness"
mode: queued
fields:
brightness:
description: 1-255
sequence:
- action: script.xmcosy_set_dp
data: { dp: 20, value: true }
- if:
- condition: template
value_template: "{{ states('sensor.xmcosy_mode') not in ['white', 'colour'] }}"
then:
# Effects always run at full brightness, so dimming means white.
- action: script.xmcosy_set_dp
data: { dp: 21, value: white }
- delay: "00:00:00.5"
- if:
- condition: state
entity_id: sensor.xmcosy_mode
state: colour
then:
- variables:
c: "{{ states('sensor.xmcosy_color') }}"
- action: light.turn_on
target:
entity_id: light.xmcosy_localtuya
data:
hs_color:
- "{{ c[7:10] | int(0, base=16) }}"
- "{{ (c[10:12] | int(0, base=16) / 2.55) | round(0) }}"
brightness: "{{ brightness | int }}"
else:
- action: script.xmcosy_set_dp
data:
dp: 22
value: "{{ [[brightness | int, 25] | max, 255] | min }}"
# Colour: switch to colour mode first, then let the LocalTuya light set it.
xmcosy_color:
alias: "XMCOSY: set colour"
mode: queued
fields:
h: { description: "Hue, 0-360" }
s: { description: "Saturation, 0-100" }
sequence:
- if:
- condition: not
conditions:
- condition: state
entity_id: sensor.xmcosy_mode
state: colour
then:
- action: script.xmcosy_set_dp
data: { dp: 21, value: colour }
- wait_for_trigger:
- trigger: state
entity_id: sensor.xmcosy_mode
to: colour
timeout: "00:00:01"
- action: light.turn_on
target:
entity_id: light.xmcosy_localtuya
data:
hs_color: ["{{ h }}", "{{ s }}"]
# White temperature. Home Assistant only speaks kelvin now and LocalTuya
# 5.2.3 still expects mireds, so we write DP 23 ourselves:
# 2700 K (370 mireds) = 0 ... 6500 K (153 mireds) = 255.
xmcosy_white:
alias: "XMCOSY: set white temperature"
mode: queued
fields:
color_temp_kelvin: { description: "2700-6500" }
sequence:
- action: script.xmcosy_set_dp
data: { dp: 20, value: true }
- if:
- condition: not
conditions:
- condition: state
entity_id: sensor.xmcosy_mode
state: white
then:
- action: script.xmcosy_set_dp
data: { dp: 21, value: white }
- delay: "00:00:00.5"
- action: script.xmcosy_set_dp
data:
dp: 23
value: >
{% set m = [[(1000000 / (color_temp_kelvin | int(2700))) | int, 153] | max, 370] | min %}
{{ (255 - 255 / (370 - 153) * (m - 153)) | int }}
# "Pick 2" colours. DP 101 ends with the two colours as hex (rrggbb rrggbb);
# whatever comes before them is kept as the device sent it.
xmcosy_pick2_color:
alias: "XMCOSY: set a Pick 2 colour"
mode: queued
fields:
slot: { description: "1 or 2" }
color: { description: "One of the colour names below" }
sequence:
- variables:
hex: >
{{ {'Black':'000000','Silver':'c0c0c0','Gray':'808080','White':'ffffff',
'Maroon':'800000','Red':'ff0000','Purple':'800080','Fuchsia':'ff00ff',
'Green':'008000','Lime':'00ff00','Olive':'808000','Yellow':'ffff00',
'Navy':'000080','Blue':'0000ff','Teal':'008080','Aqua':'00ffff'}.get(color, '') }}
raw: "{{ states('sensor.xmcosy_pick2_colors') | lower | trim }}"
- condition: template
value_template: "{{ hex != '' and raw | length >= 12 and has_value('sensor.xmcosy_pick2_colors') }}"
- action: script.xmcosy_set_dp
data:
dp: 101
value: >
{% set head, c1, c2 = raw[:-12], raw[-12:-6], raw[-6:] %}
{{ head ~ (hex if slot | int == 1 else c1) ~ (hex if slot | int == 2 else c2) }}
# Show the new colours right away.
- if:
- condition: template
value_template: >
{{ not is_state('light.string_lights', 'on')
or states('sensor.xmcosy_mode') != 'scene8' }}
then:
- action: light.turn_on
target:
entity_id: light.string_lights
data:
effect: Pick 2
template:
- light:
- unique_id: xmcosy_string_lights
name: String Lights
default_entity_id: light.string_lights
state: "{{ is_state('light.xmcosy_localtuya', 'on') }}"
availability: "{{ has_value('light.xmcosy_localtuya') }}"
# Brightness: DP 22 in white mode, the end of DP 24 in colour mode;
# effects always run at full brightness.
level: >
{% set mode = states('sensor.xmcosy_mode') %}
{% if mode == 'white' %}
{{ states('sensor.xmcosy_white_brightness') | int(255) }}
{% elif mode == 'colour' %}
{{ states('sensor.xmcosy_color')[12:14] | int(255, base=16) }}
{% else %}
255
{% endif %}
# Template lights still take mireds here.
min_mireds: "153"
max_mireds: "370"
temperature: >
{% if is_state('sensor.xmcosy_mode', 'white') and has_value('sensor.xmcosy_white_temp') %}
{{ (153 + (255 - states('sensor.xmcosy_white_temp') | int) * (370 - 153) / 255) | round(0) }}
{% else %}
{{ none }}
{% endif %}
# DP 24: rrggbb, a 0, then hue (3 hex digits, 0-360), saturation and value (2 each, 0-255).
hs: >
{% set c = states('sensor.xmcosy_color') %}
{% if is_state('sensor.xmcosy_mode', 'colour') and c | length >= 14 %}
{{ (c[7:10] | int(0, base=16), (c[10:12] | int(0, base=16) / 2.55) | round(0)) }}
{% else %}
{{ none }}
{% endif %}
effect_list: "{{ ['White', 'Color', 'Strobe', 'Fade', 'Pulse', 'Blink', 'Chase', 'Christmas', 'America', 'Pick 2', 'Multi'] }}"
effect: >
{{ {'white': 'White', 'colour': 'Color', 'scene1': 'Strobe', 'scene2': 'Fade',
'scene3': 'Pulse', 'scene4': 'Blink', 'scene5': 'Chase', 'scene6': 'Christmas',
'scene7': 'America', 'scene8': 'Pick 2', 'scene9': 'Multi'}
.get(states('sensor.xmcosy_mode'), none) }}
turn_on:
- action: script.xmcosy_set_dp
data: { dp: 20, value: true }
turn_off:
- action: script.xmcosy_set_dp
data: { dp: 20, value: false }
set_level:
- action: script.xmcosy_brightness
data:
brightness: "{{ brightness }}"
set_temperature:
- action: script.xmcosy_white
data:
color_temp_kelvin: "{{ color_temp_kelvin }}"
set_hs:
- action: script.xmcosy_color
data:
h: "{{ hs[0] }}"
s: "{{ hs[1] }}"
set_effect:
- action: script.xmcosy_set_dp
data: { dp: 20, value: true }
- action: script.xmcosy_set_dp
data:
dp: 21
value: >
{{ {'White': 'white', 'Color': 'colour', 'Strobe': 'scene1', 'Fade': 'scene2',
'Pulse': 'scene3', 'Blink': 'scene4', 'Chase': 'scene5', 'Christmas': 'scene6',
'America': 'scene7', 'Pick 2': 'scene8', 'Multi': 'scene9'}.get(effect, 'white') }}
- select:
# The same effects as a dropdown, for dashboards and voice assistants
# that can't pick a light effect.
- unique_id: xmcosy_string_lights_scene
name: String Lights Scene
options: "{{ ['White', 'Color', 'Strobe', 'Fade', 'Pulse', 'Blink', 'Chase', 'Christmas', 'America', 'Pick 2', 'Multi'] }}"
state: >
{{ {'white': 'White', 'colour': 'Color', 'scene1': 'Strobe', 'scene2': 'Fade',
'scene3': 'Pulse', 'scene4': 'Blink', 'scene5': 'Chase', 'scene6': 'Christmas',
'scene7': 'America', 'scene8': 'Pick 2', 'scene9': 'Multi'}
.get(states('sensor.xmcosy_mode'), none) }}
select_option:
- action: light.turn_on
target:
entity_id: light.string_lights
data:
effect: "{{ option }}"
# The two "Pick 2" colours, read back from the lights themselves.
# A colour set in the Tuya app that isn't in this list shows as unknown.
- unique_id: xmcosy_string_lights_color_1
name: String Lights Color 1
options: &xmcosy_colors "{{ ['Black', 'Silver', 'Gray', 'White', 'Maroon', 'Red', 'Purple', 'Fuchsia', 'Green', 'Lime', 'Olive', 'Yellow', 'Navy', 'Blue', 'Teal', 'Aqua'] }}"
state: >
{% set raw = states('sensor.xmcosy_pick2_colors') | lower | trim %}
{{ {'000000':'Black','c0c0c0':'Silver','808080':'Gray','ffffff':'White',
'800000':'Maroon','ff0000':'Red','800080':'Purple','ff00ff':'Fuchsia',
'008000':'Green','00ff00':'Lime','808000':'Olive','ffff00':'Yellow',
'000080':'Navy','0000ff':'Blue','008080':'Teal','00ffff':'Aqua'}.get(raw[-12:-6], none) }}
select_option:
- action: script.xmcosy_pick2_color
data: { slot: 1, color: "{{ option }}" }
- unique_id: xmcosy_string_lights_color_2
name: String Lights Color 2
options: *xmcosy_colors
state: >
{% set raw = states('sensor.xmcosy_pick2_colors') | lower | trim %}
{{ {'000000':'Black','c0c0c0':'Silver','808080':'Gray','ffffff':'White',
'800000':'Maroon','ff0000':'Red','800080':'Purple','ff00ff':'Fuchsia',
'008000':'Green','00ff00':'Lime','808000':'Olive','ffff00':'Yellow',
'000080':'Navy','0000ff':'Blue','008080':'Teal','00ffff':'Aqua'}.get(raw[-6:], none) }}
select_option:
- action: script.xmcosy_pick2_color
data: { slot: 2, color: "{{ option }}" } What You Get
light.string_lights: on and off, brightness, white temperature, color, and the scenes as effects. It works like any other light in Home Assistant, so voice assistants, scenes and automations can use it.select.string_lights_scene: the same scenes as a dropdown.select.string_lights_color_1 and select.string_lights_color_2: the two "Pick 2" colors. Changing either one switches the lights to Pick 2 (and turns them on) so you can see it right away. How It Works
script.xmcosy_brightness looks at the mode: in white it writes DP 22; in color it reads the current hue and saturation out of DP 24 and hands them to the LocalTuya light together with the new brightness, and the conversion to DP 24 happens without any help. That's what replaced Node-RED. If an effect is running, dimming switches the lights back to white first, since an effect can't be dimmed.script.xmcosy_white converts kelvin to mireds, clamps it to 153-370 (6500-2700 K) and scales it the same way LocalTuya does, so 2700 K is 0 and 6500 K is 255. The light's temperature template does the same math backwards to report it.options list.script.xmcosy_set_dp, so the Tuya device ID appears once.light.string_lights is a normal light, so whatever you'd do with any other light works here too. A Few Honest Notes
Link to Purchase