

Introduction
As many of you (the people who would be interested enough to read this post), I have a number of self hosted services which have become integral to my everyday life. For the most part, I use a wireguard (split) tunnel to access these services remotely from my phone or laptop. However, there are some services, like Nextcloud, for which I prefer public access so that I can access them from any computer. Up till now, I have opened port 443 on my router and forwarded incoming traffic to an instance of Nginx Proxy Manager. This has been working fine for the most part, but I have a residential ISP with a dynamic IP address. Even though I have my incoming connections go through my OPNsense router with crowdsec and geo block lists, I just never liked the idea of opening ports on my router.

To solve this, I became enamored with the idea of setting up a public IP address on a VPS which would send the connection requests to my NPM instance through a wireguard tunnel.
There are plenty of tutorials how to forward connections through Wireguard, and there is an amazing tool to do almost exactly what I described. However, the tool requires a linux endpoint on the local network as opposed to sending all connections to OPNsense. My ideal plan would have the VPS connections first passing through OPNsense where they could be acted upon as any other incoming connection.
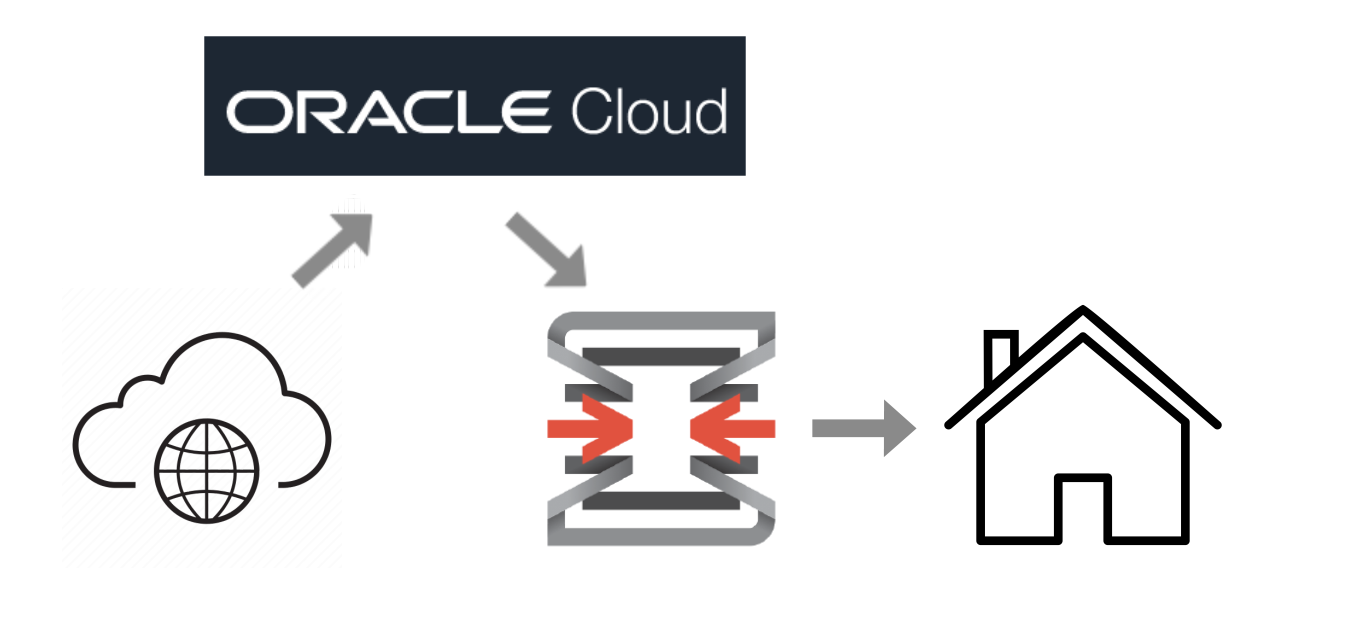
So ultimately, at the end of this tutorial, we will have a static IP address through a free oracle cloud virtual machine. It will forward whichever connections we want to OPNsense. I’m sure this could be configured as a VPN endpoint for all connections if desired, but that won’t be covered here.
Oracle Cloud
Ok, so first thing we need to do is set up our virtual machine on the Oracle Cloud platform.
Oracle has a free tier and “Always Free Resources”. Obviously, they could always take these free resources as many cloud providers eventually do, but lets hope if it happens, it doesn’t happen for a while.

So first step, create an account.
Instead of going straight to making a new compute instance, I had to make a “compartment”. I think that’s how the compute instances are clustered. To be honest, I am not sure that I actually needed to make a new compartment but had trouble getting my machine set up without it.
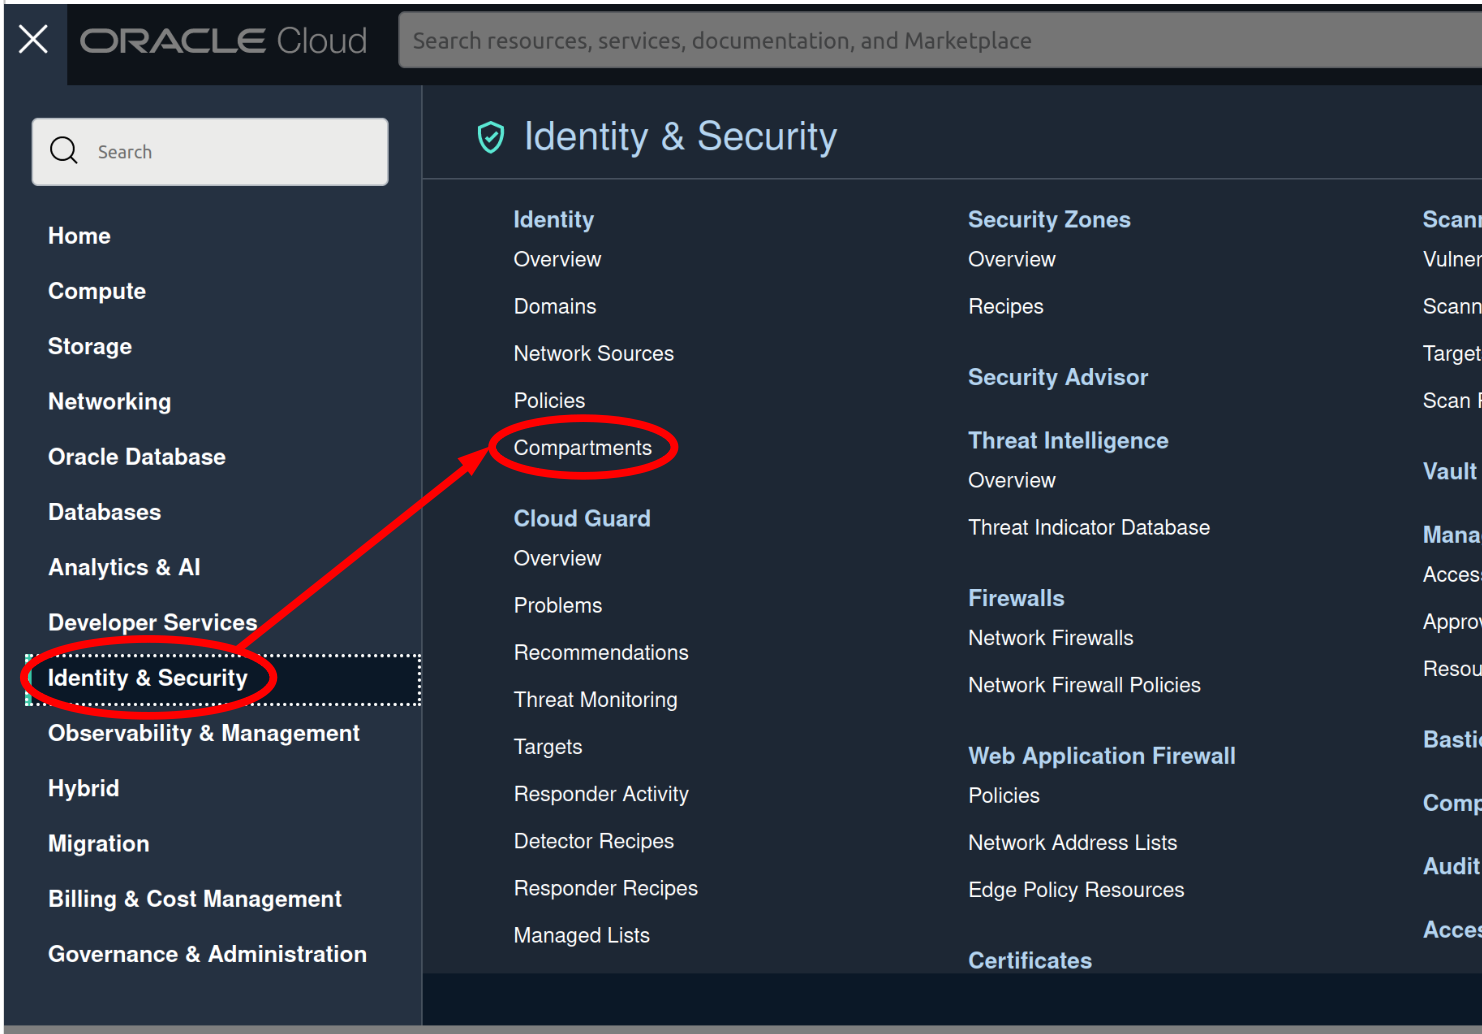
From there, create a new compartment. Name it whatever you want, and for parent compartment, select your root.
Next click on the big Oracle Cloud image top left to go back to the main page. Now we will set up our compute instance.
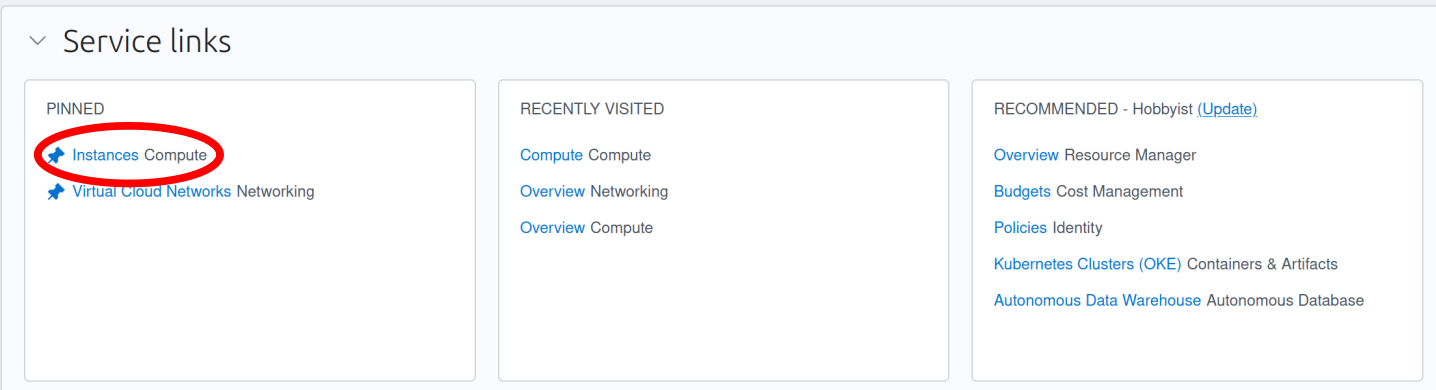
Click the “Create Instsance” button.
On the next page, we will set up our machine and make sure to select options which are part of the “Always Free” subscription.
Under “create in compartment,” be sure to select the compartment we just set up.
Keep the defaults for Placement.
Now for Image & Shape, we will change some options. For the purposes of this tutorial, I will use the Ubuntu image. It’s free and it’s what I am familiar with.
Under Shape Series, select “Ampere” and let’s max out our machine specs under the Free Tier.
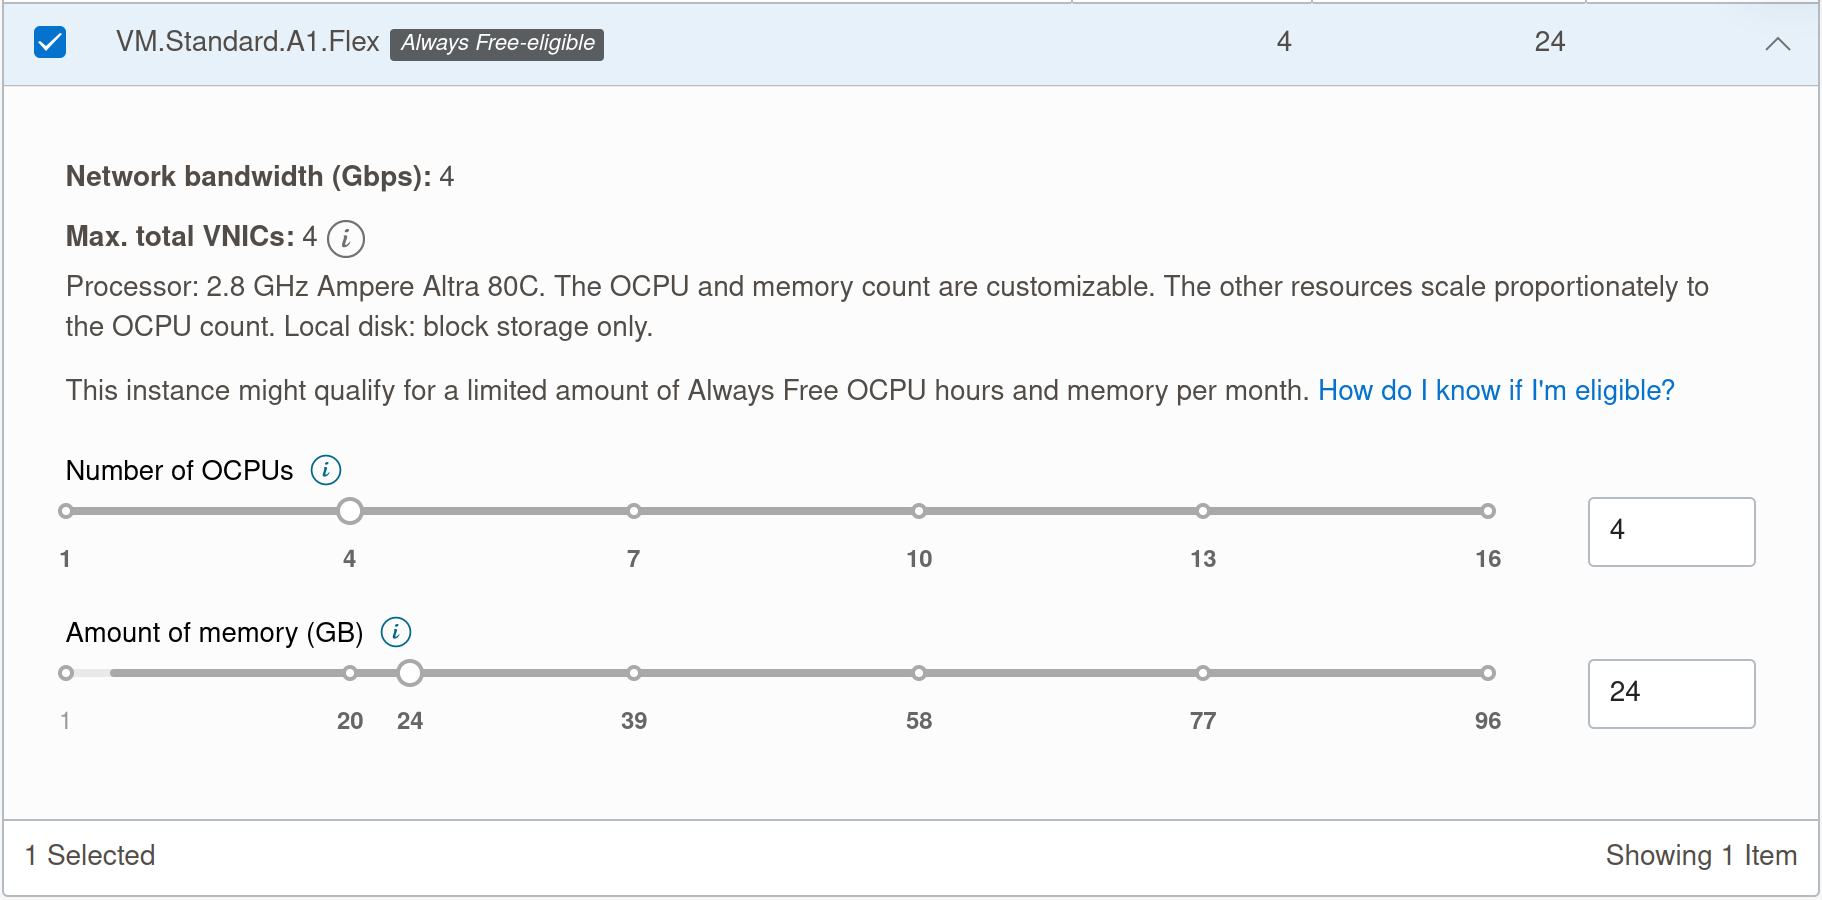
Click select shape and proceed. Keep networking options as default.
Be sure to save your SSH key! It will be the only way to log in to your machine. Then leave the boot volume as default and we are done setting up our machine!
Now back at the instances screen, you should see your new instance along with its public IP address and its internal IP address. We will use the public IP address to SSH in, but first lets adjust the firewall settings.
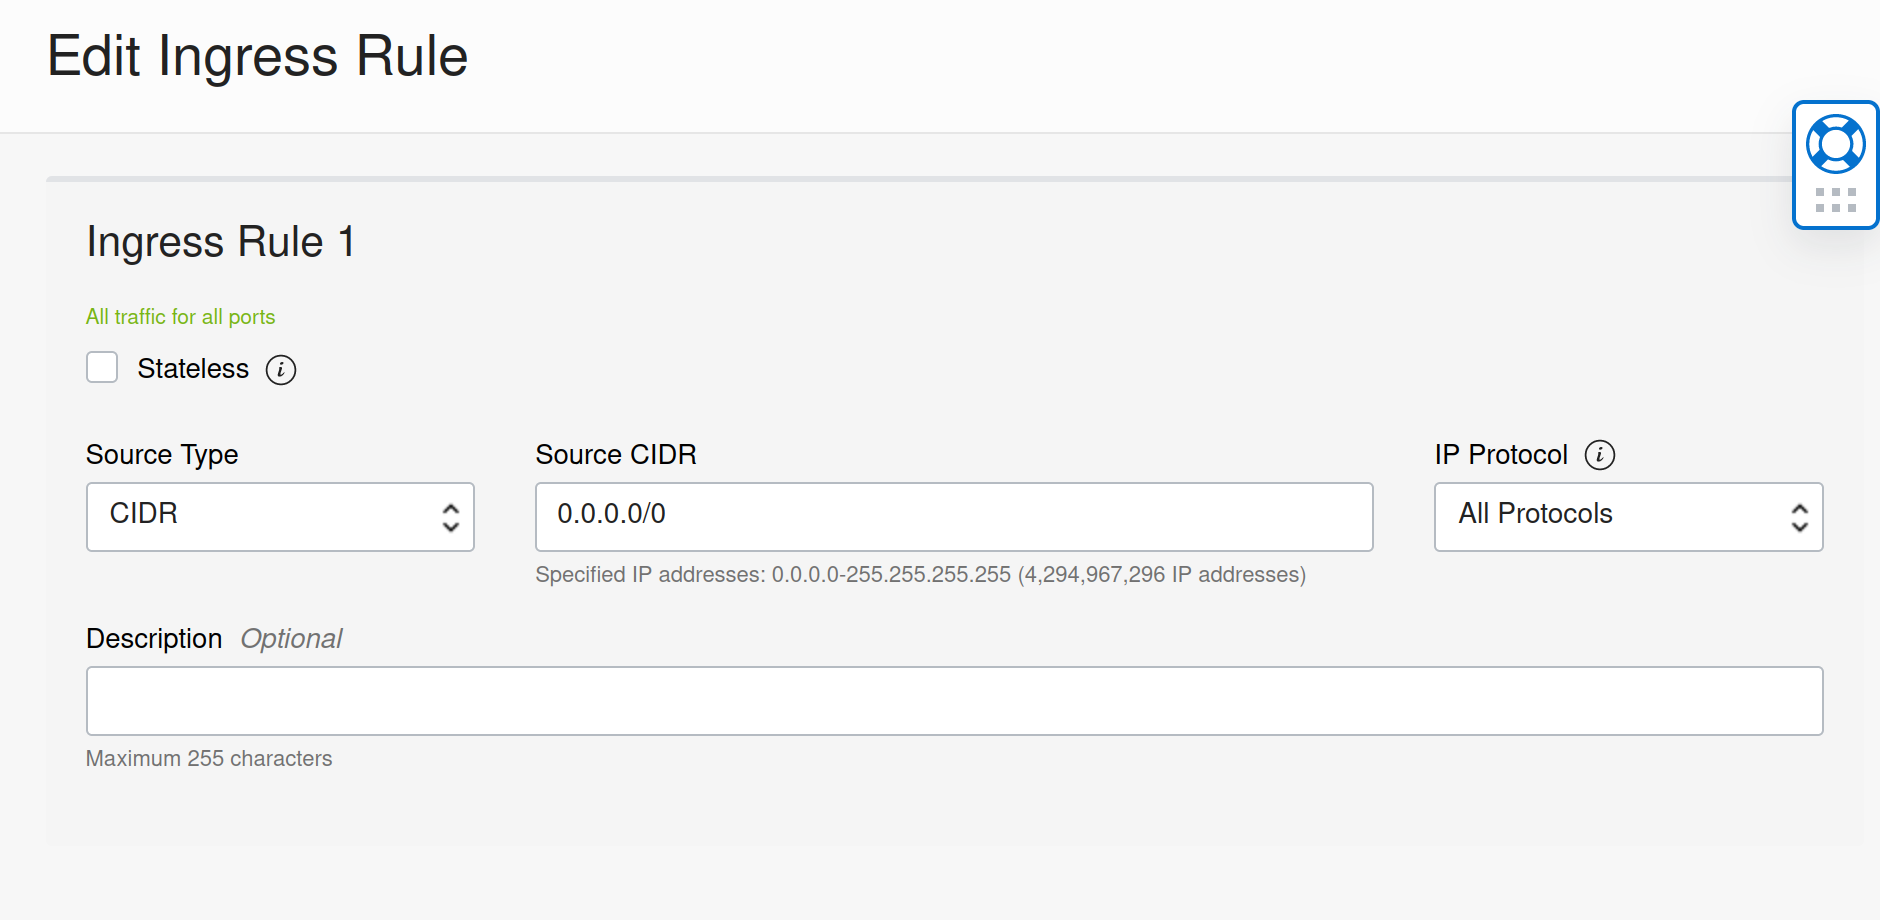
Click on your instance name. Under “Primary VNIC”, then subnet, there should be a hyperlink to the subnet your machine is using. Click on it. Scroll down and click on the default security list. I erased all of the default firewall rules and replaced them with a rule to allow all traffic as we can just rely on ufw to protect our machine.
Ok perfect, now lets get into our machine. We are going to use the Public IP address to SSH in to our server and get to work. Find your Private SSH key and add it to your ~/.ssh directory. Set the permissions for the key to 600. Now you can access your server with the following:
ssh -i /ssh/directory/private.key ubuntu@PUBLIC-IPInstall Wireguard with the following:
sudo apt update
sudo apt install wireguard
Now create a public and private wireguard key.
wg genkey | sudo tee /etc/wireguard/private.key
sudo chmod go= /etc/wireguard/private.key
sudo cat /etc/wireguard/private.key | wg pubkey | sudo tee /etc/wireguard/public.key
Make note of those keys as we will need them. Now we can start setting up our Wireguard server configurtion.
sudo nano /etc/wireguard/wg0.confAnd use the following:
[Interface]
PrivateKey = {{private key you just generated}}
ListenPort = 51820
#(any port above here)
Address = 10.1.0.1/24
#(an address from a different subnet from your private LAN)
MTU = 1420

PostUp = iptables -A FORWARD -i enp0s3 -j ACCEPT; iptables -t nat -A POSTROUTING -o wg0
PostDown = iptables -D FORWARD -i enp0s3 -j ACCEPT; iptables -t nat -A POSTROUTING -o wg0
#enp0s3 is whatever your virtual machines main interface is called

[Peer]
PublicKey = {{ we do not have this yet }}
AllowedIPs = 10.1.0.0/24, {{address of npm/32}}
PersistentKeepalive = 25
Now let’s make sure we have forwarding set up in our Oracle machine. We are going to edit sysctl.conf. First open it.
sudo nano /etc/sysctl.conf
Add the following two lines:
net.ipv4.ip_forward=1
net.ipv6.conf.all.forwarding=1
Then enter the following command or reboot:
sudo sysctl -pAlmost ready to move over to the OPNsense side of things. Let’s just set up our firewall before we forget.
We will use ufw which is included in the ubuntu image.
Add ssh port:
sudo ufw allow 22/tcpHttps port:
sudo ufw allow 443/tcpWireguard port (change as necessary):
sudo ufw allow 51820/udpThen enable the firewall:
sudo ufw enableAnd check the status to make sure we are secured:
sudo ufw statusand we should see something like:
Status: active

To                         Action      From
--                         ------      ----
22/tcp                     ALLOW       Anywhere
51820/udp                  ALLOW       Anywhere
443/tcp                    ALLOW       Anywhere
Ok perfect. Let’s change our attention to OPNsense.
OPNsense
This part only requires a few things but took me DAYS of neglecting my family and responsibilities to figure it out. I was pointed in the right direction here. Like I said, I already have a Wireguard server set up on my OPNsense box, and was trying to incorporate this new client in that network. That proved to be impossible- at least for me. Then it struck me- I would just make a NEW wireguard network on the OPNsense machine, and this one would act as a client instead of a server as I had initially thought it would.
So if you haven’t already, install either the wireguard-go or wireguard-kmod package on your OPNsense box.
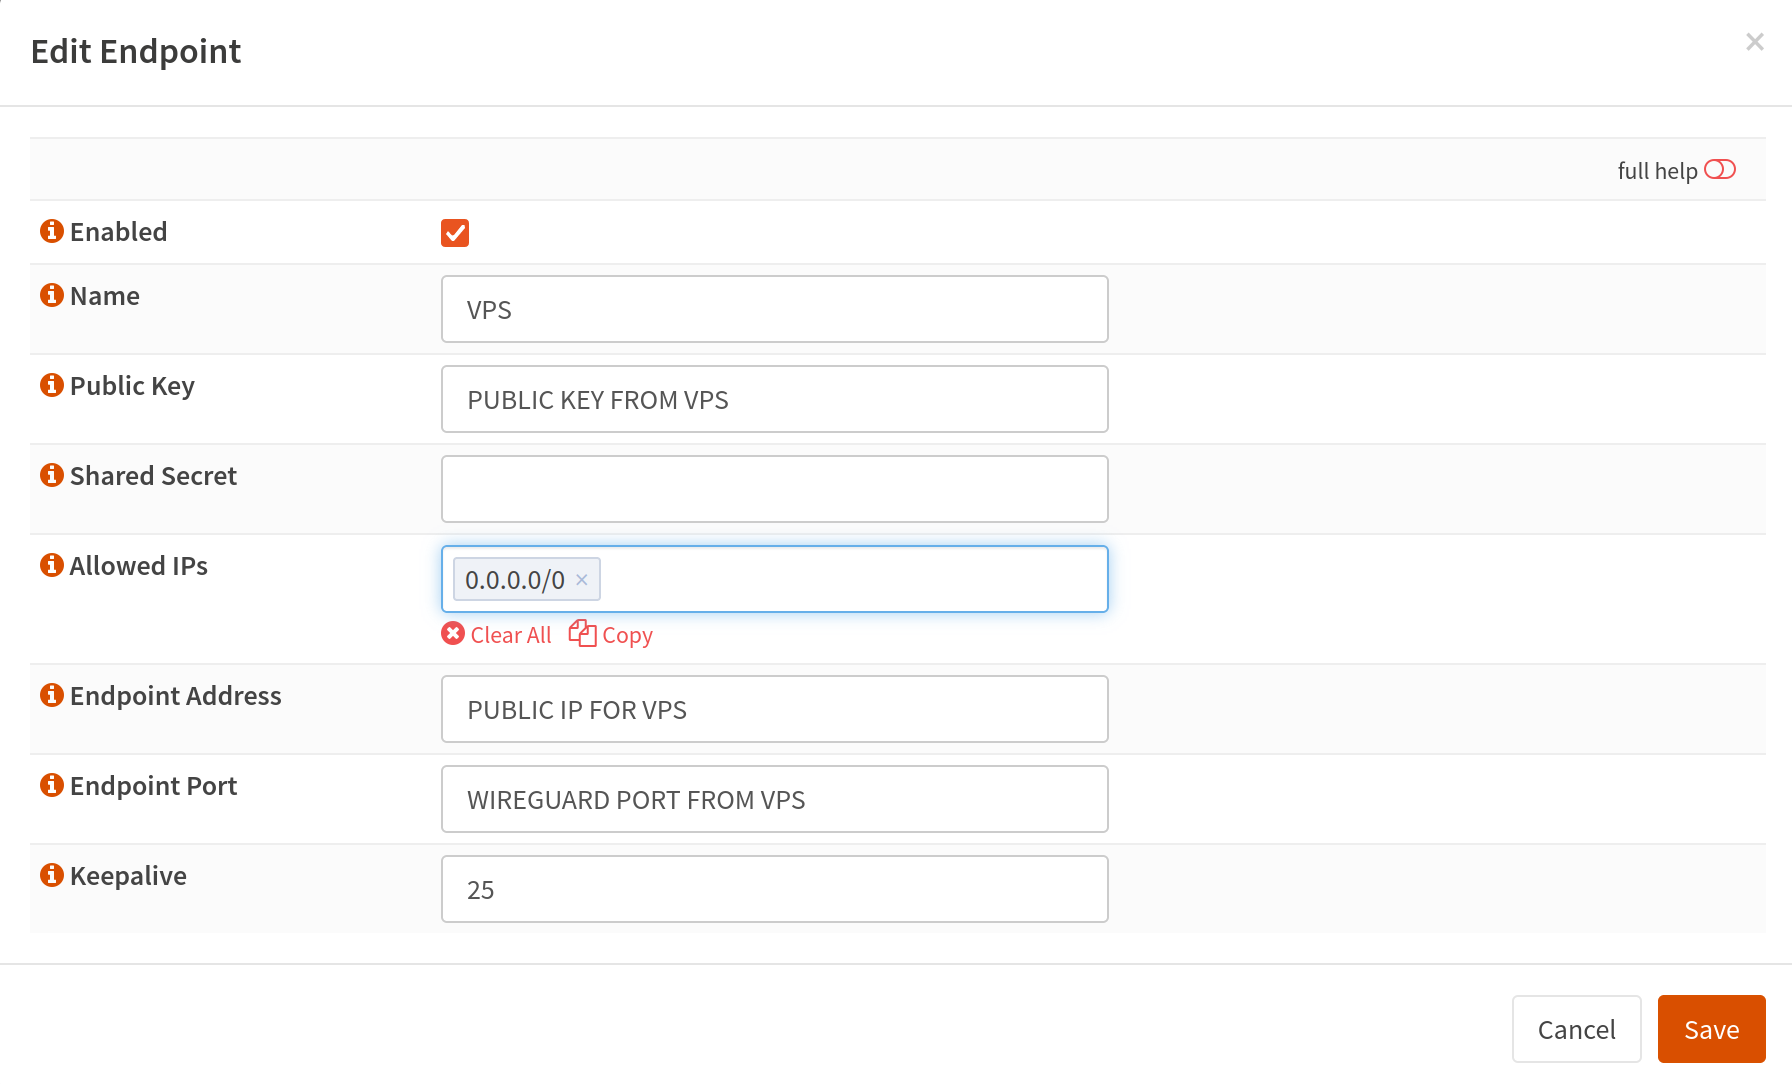
Go to the Wireguard menu and then the Endpoints tab. Create a new endpoint and fill it out like so:
Now switch to the Local tab and create a new entry like so:
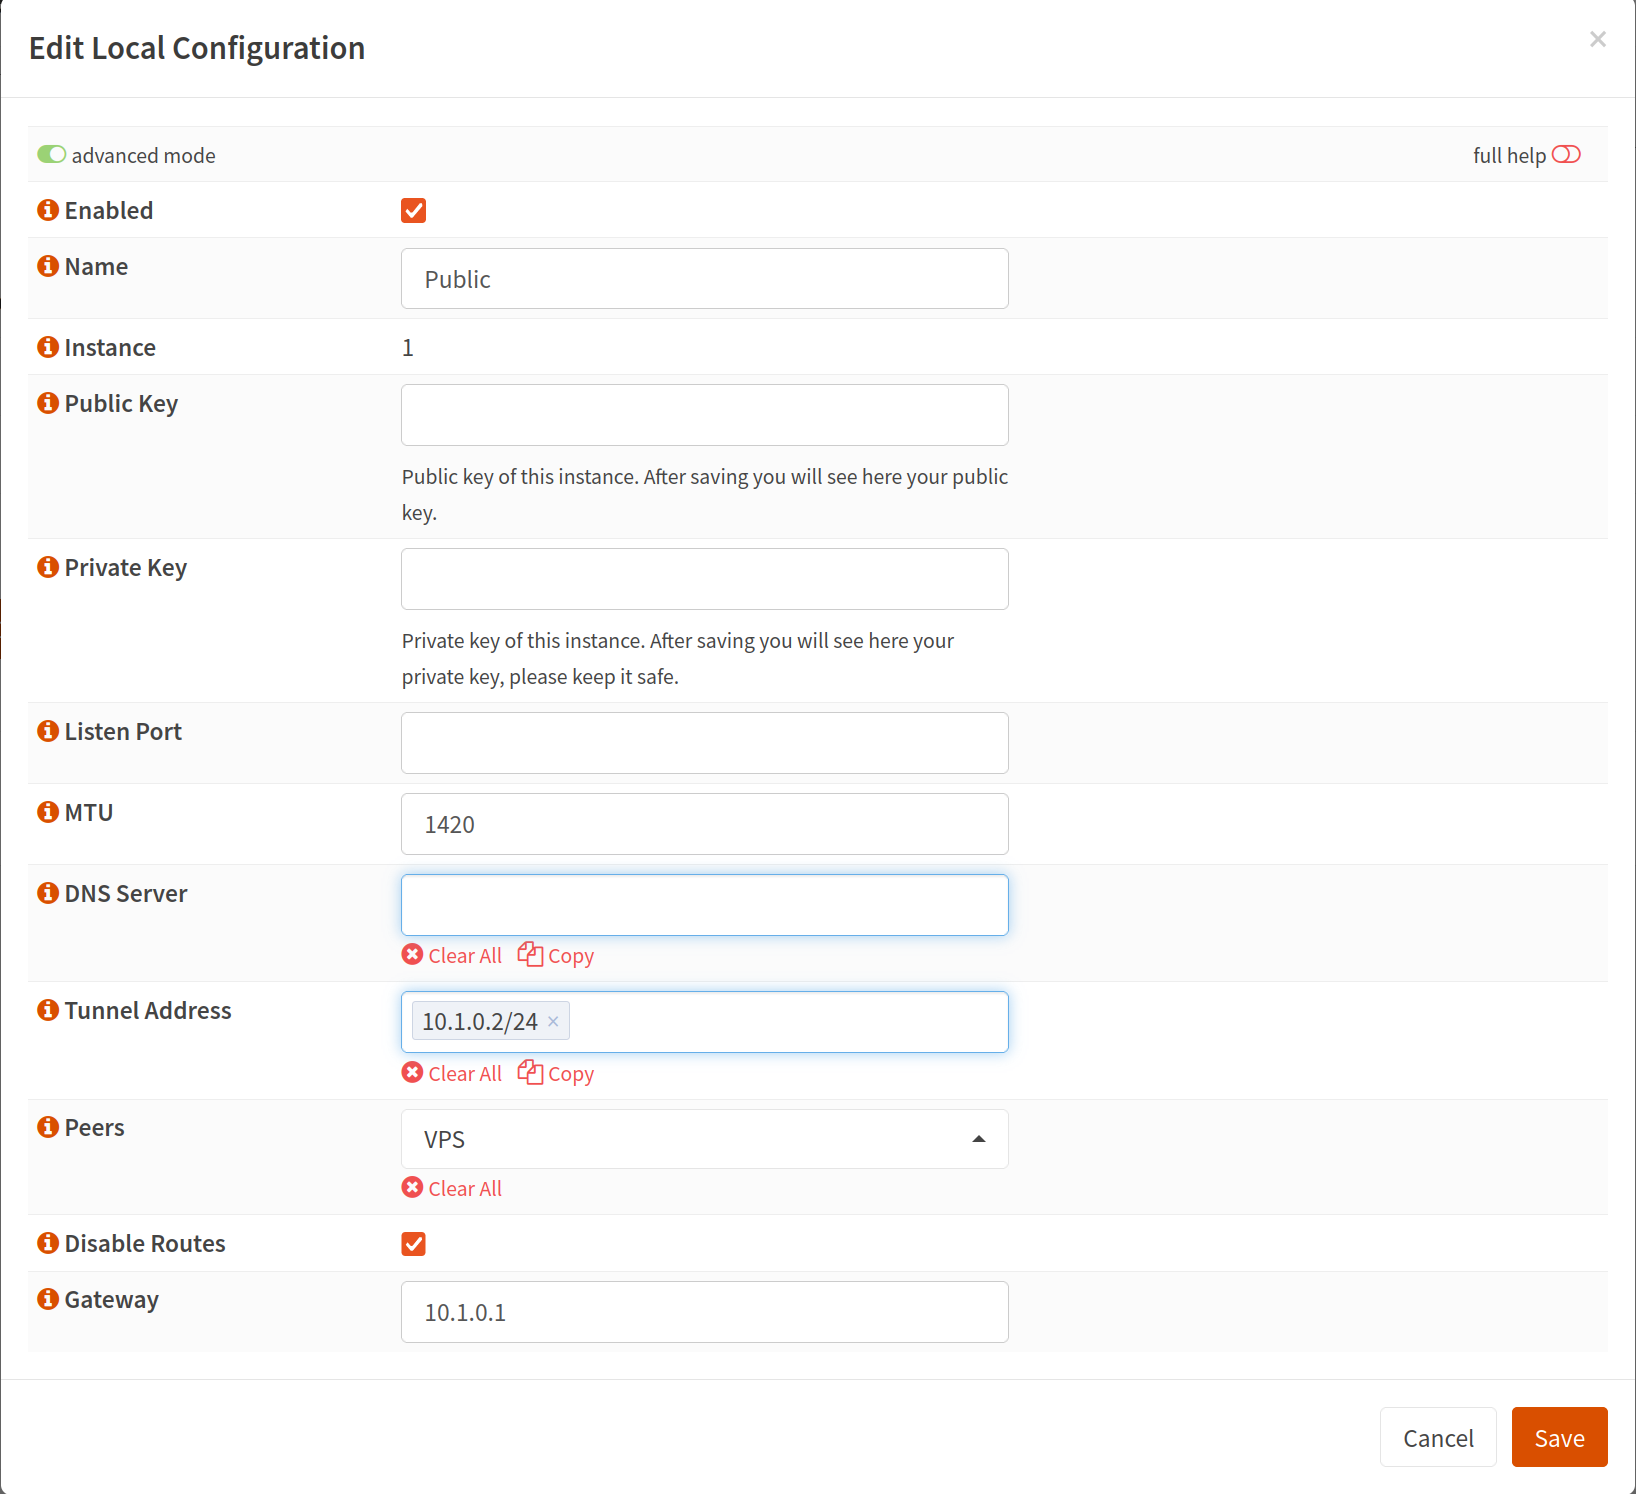
Make sure advanced options are checked. Call it whatever you want, set an MTU (I think?). Enter what this client’s IP address will be. Since our VPS is 10.1.0.1, I chose 10.1.0.2 for this client, and make sure to use the /24 subnet. Select your previously made endpoint under peers. MAKE SURE TO CLICK DISABLE ROUTES. Otherwise when you initiate the connection, the routing tables will be edited to try and send all traffic through the Wireguard network. Then make sure to enter the VPS Wireguard IP address for the Gateway.
There is no private or public key but after you click save and reopen the entry, you should see that populate. Take the Public Key, go back to our wg0.conf from the VPS and add the public key as indicated earlier under the “[Peer]” section.
Now, on our VPS, you can bring up the wg0 interface by entering the following:
sudo wg-quick up wg0You can also set it to start at boot and enable with:
sudo systemctl enable --now wg-quick@wg0Back to OPNsense…
Turn Wireguard on and off from OPNsense. Now lets give it an interface so we can more easily manipulate the connection and create firewall rules. Go to Interface –> Assignments. There should be an option at the bottom to add a new interface and one of the interfaces from the dropdown menu should be the new Wireguard connection (wg0) and call it whatever you want.
After refreshing the page, the new VPS/Wireguard interface should be listed in the Interfaces section.
Click on it, make sure it is enabled, and click Promiscuous mode, save.
Ok almost done. Now we’ll just go down the line and add the settings necessary for our VPS to act as the external gateway we want.
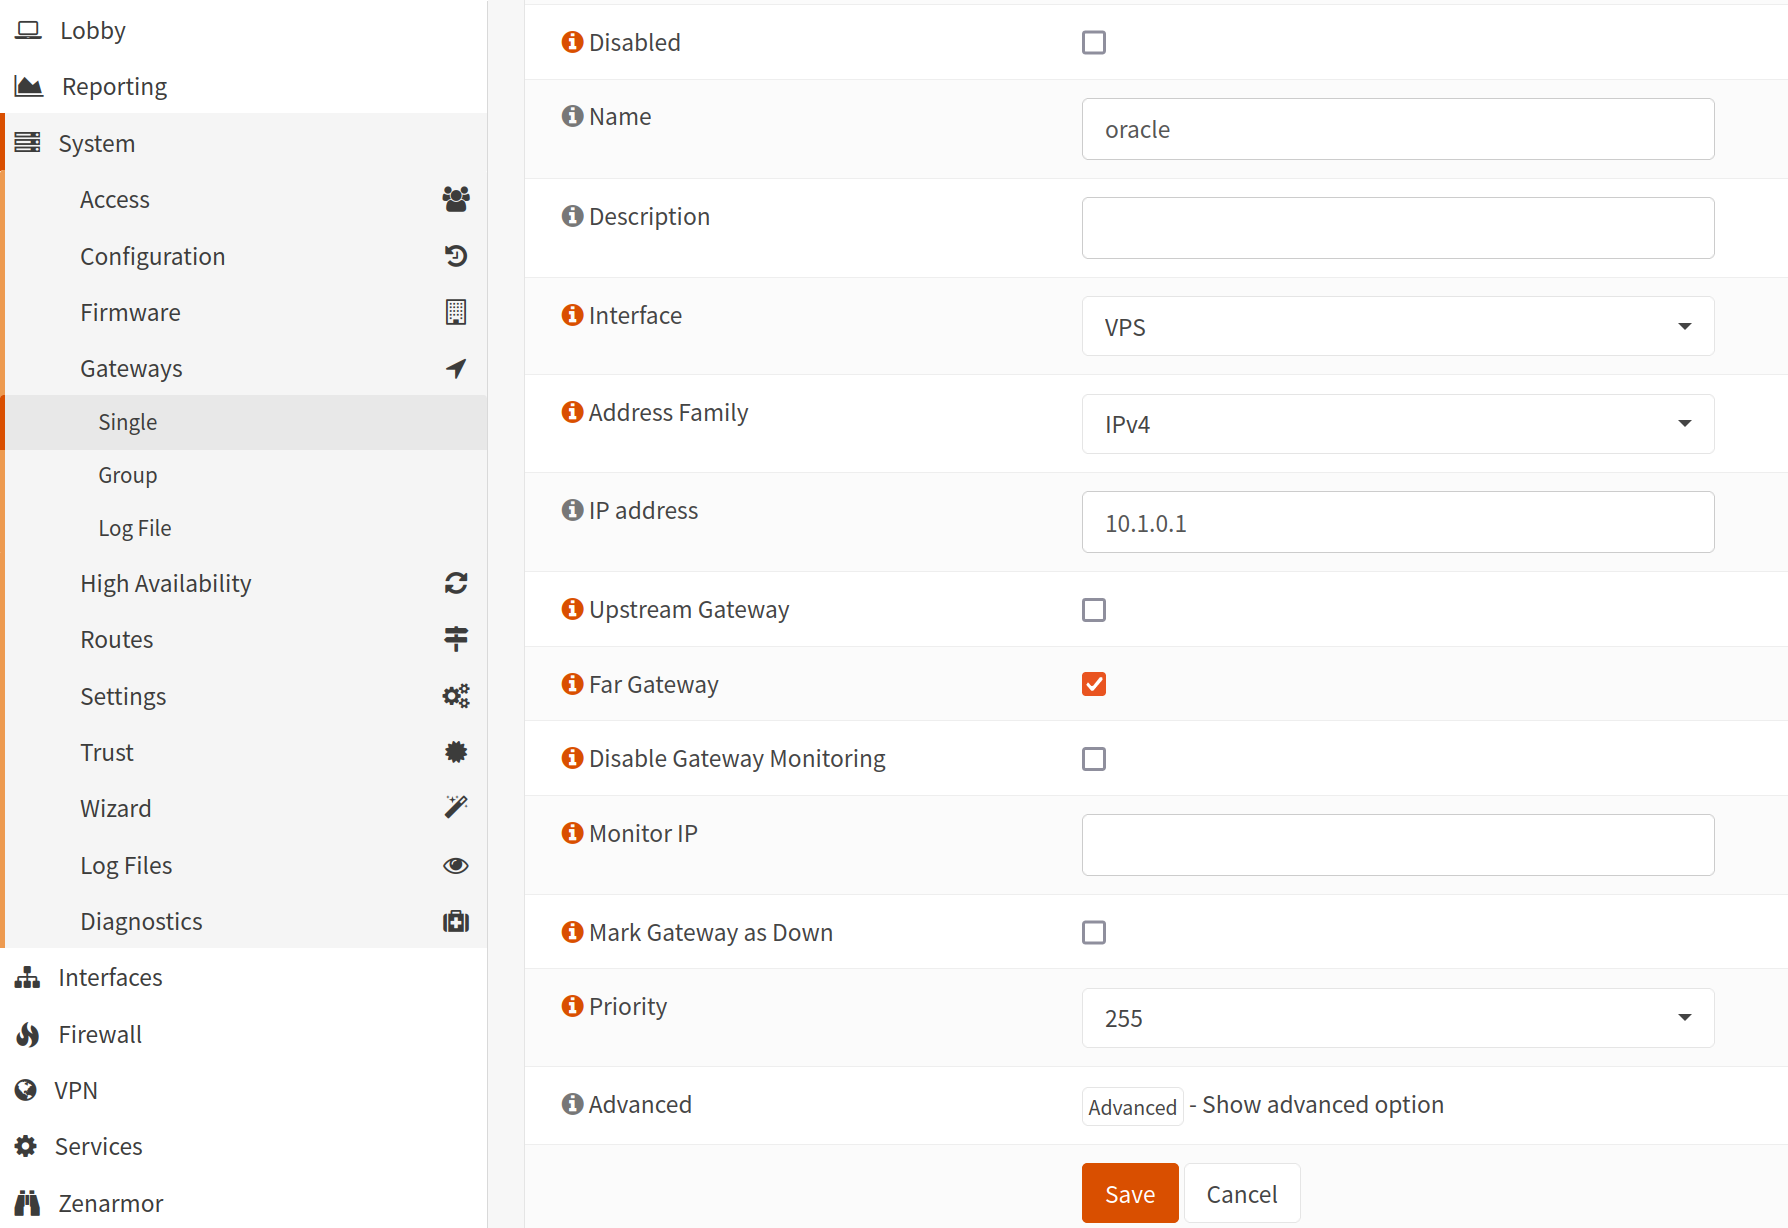
Change the settings to match what I have above. The IP address should be the IP address of the Wireguard interface on the VPS.
Next, the connection we receive on port 443, will be forwarded to the OPNsense router on that same interface. We will go to the Port Forwarding tab and create a rule to forward that connection to wherever our NPM instance is. However, aside from the usual port forwarding rule, we are going to make two changes.
- Add something to “Set local tag”. I just put “oracle”. It doesn’t matter what you pick.
- For “Filter Rule Association”, change it to “none”.
Now we will move on to the firewall rules for our new VPS/Wireguard interface. Currently, without any rules, all traffic will be blocked. I only have two rules:
- Allow 443 traffic to the NPM instance.
- Allow communication between clients on our interface subnet
- Geo-block IPs if desired

I also included the same “set local tag” directive with “oracle” to both of those above Pass rules. Not sure if that is necessary, but I figured it wouldn’t hurt. Basically, I want anything that comes in through this interface to leave through it.
Finally, we will tell the router how to send the packets back out through the VPS as opposed to leaving through our regular gateway.
Go to the interface where your NPM instance is. Make a new firewall rule. This time, however, instead of choosing “in” for the direction, choose “out”. Then we can leave everything alone and just make a few changes under the “Advanced” section.
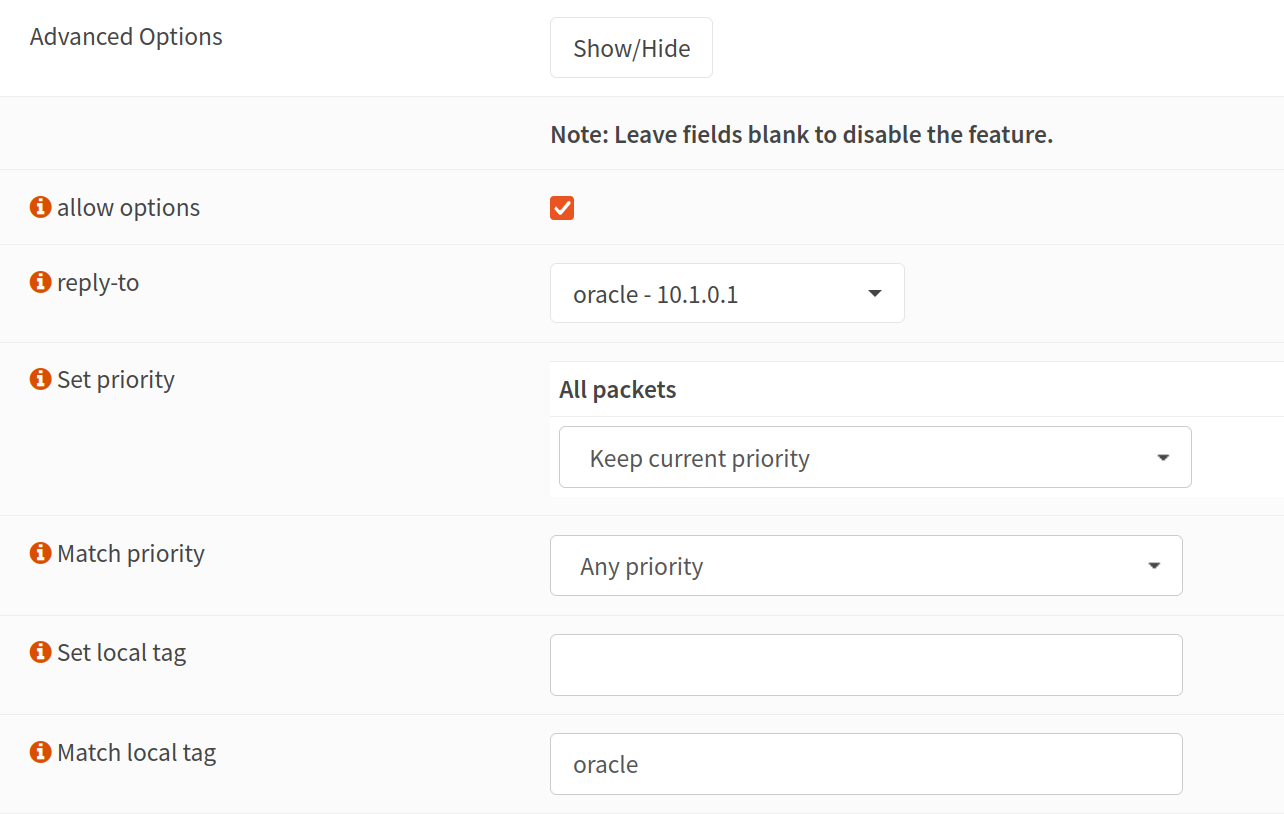
There are three things to do here.
- select allow options
- change the reply-to gateway to the gateway we just created
- match local tag to whatever you used in the previous rules. Mine is “oracle”.
You can be more specific if you want, but the traffic we are interested in is already tagged so I think the firewall rule is likely fine how it is. Now the firewall will know to reply back to our VPS and not through Verizon or Comcast or whatever.
At this point, I would probably restart the VPS and then take the Wireguard service down and then up to make sure that all our new rules are working and activated.
Conclusion
If everything worked the way it should, you should now be able to set the DNS records for your web services to point to the public IP address of your VPS. Supposedly, this will remain free forever but of course that remains to be seen. Not sure if this really makes things safer or more secure than just opening port 443 of your firewall really, but I feel like it can’t hurt? If nothing else, I have noticed a significant improvement with the initial web connection when accessing my home services. I suppose that these residential connections probably aren’t designed to accommodate incoming web requests but this also may be placebo.
I’d say to post a comment with any questions, but to be honest, there are so many spam comments that I’ll probably miss it anyway…