

UPDATE: PART 3 has instructions for email backup using pre-made docker images based on this post and Part 2.
Intro
In the world of self-hosting, creating a personal email server always seemed like the Holy Grail of personal privacy. Unfortunately, with all the work that would go into maintaining it, and the high probability of failure when operated by someone as inexperienced as myself, it has never seemed like a viable option for me. However, I have wanted a system for some time whereby I can automatically backup my email in a standard format which could potentially be served to me through standard mail apps by hosting my own internal IMAP server.
After doing a fair amount of research, unfortunately, I could not find any suitable ready-made Docker solutions to accomplish this. However, I was able to create something fairly simple and elegant.
I am going to share my solution which, while it took me a lot of work, should be fairly easy to set up.
It requires three parts:
- mbsync – a command line utility to synchronize IMAP servers
- dovecot – IMAP server software
- an email client
A major benefit of this set up could be for people with limited space in their email mailboxes. Instead of deleting emails to remain under 15gigs, you could essentially backup all emails to your home server, delete emails on the remote server, and still have easy, ready access to everything.
Initial Set Up
I have done this on Proxmox by creating a Ubuntu 20.04 LXC. I am using iSCSI for storage so that while the LXC is being run on my Proxmox machine, the data is being saved on my NAS where it has RAID protection, snapshots, and backups.
I will go through the process assuming Ubuntu LXC, but I imagine this should work with any Ubuntu installation.
I made my LXC with 2 cores and 1GB of RAM. Something I think that’s important, is to make a non-root user with sudo privileges. This username and password will be the username and password for your IMAP server so you may want to make it relatively secure. To do so, enter the following commands:
sudo adduser <username>
sudo usermod -aG sudo <username>
Then you can sign out of the root username and log in to the LXC using your new credentials.
Afterwards, update the LXC to the latest with
sudo apt update && sudo apt upgrade -yMbsync
Mbsync is a very powerful IMAP syncing software. It downloads your IMAP emails into a Maildir format in which each email is its own file and the file structure of your mailbox disk directory mimics the mailbox itself. It is a command line tool, but was fortunately fairly easy to work with. It can do a lot and I’m sure I barely scratched the surface, but for my purposes, I set it up to download all new emails from the server, but to not propagate any deletions, and to not propagate any changes from my local instances back. This is a one way trip, but allowing deletions of this archive would defeat a major purpose of creating it.
Confusingly, to install mbsync, you have to use its legacy name, isync.
sudo apt install isyncThen it’s important to make the configuration file or else the program will not run.
sudo nano ~/.mbsyncrcand populate accordingly. Below is the template I use with a short explanation. There are many other configuration options if you are interested in further customizing it.
# Set up according to your email provider. It will probably involve creating an application password.
IMAPAccount <email account>
Host <host name>
Port <port>
User <username>
Pass <password>
# select one
SSLType < None | STARTTLS | IMAPS >
# select one
SSLVersions < SSLv3 | TLSv1 | TLSv1.1 | TLSv1.2 | TLSv1.3 >

# I use fastmail and so my settings will reflect that but change as needed.
# I believe IMAPStore is relatively arbitrary and has to do with how settings are stored. <something>-remote appears to be convention.
IMAPStore fastmail-remote
# pick a name
Account fastmail

# This section describes the local storage
# pick a name similar to what you picked for IMAPStore
MaildirStore fastmail-local

#The root of your mailbox. By convention the Maildir directory is in the user's home folder.
Path /home/thehelpfulidiot/Maildir/
#The inbox seems to be a special folder in a mailbox so you need to specify it explicitly and then the other folders will be auto-created.
Inbox /home/thehelpfulidiot/Maildir/Inbox/
# Adds additional subfolders to match IMAP folder names
SubFolders Verbatim

# A channel defines how the sync will occur between the server and local storage.
# pick a name
Channel fastmail
# use what you have for IMAPStore above between two :'s
Master :fastmail-remote:
# use what you have for MaildirStore above between two :'s
Slave :fastmail-local:
# You can control what gets synced. '*' syncs everything.
Patterns *
# Do not remove messages marked for deletion
Expunge None
# Do not remove deleted mailboxes
Remove None
# use the arrival date and time from the IMAP server for the original message
CopyArrivalDate yes
# You can see all the different ways to sync the mailboxes by going to the link above, but this will sync from remote to local without propagating deletions.
Sync PullNew
# automatically create necessary mailboxes locally
Create Slave
#keeps the mailbox sync state files in the local mailbox
SyncState *
Press “ctrl+x”, Y to save, enter.
Now make the mail directory you specified a moment ago. If using the same directory as I specified in the example config file, from your home directory, enter:
mkdir MaildirThen run mbsync for the first time to download the emails.
mbsync -aThis will take a while if your email folder is like mine. Take a break and come back when it’s done. If you set up your config file like mine, mbsync will recreate all your mail folders locally.
I got a socket error during the first sync, but luckily, mbsync can pick up from wherever it leaves off, so just run ‘mbsync -a’ as many times as you need to get the whole mailbox synced initially.
So now that your current mailbox is fully synced with your local archive, we need to set up a mechanism to pull new messages. As in all things, the archwiki page on mbsync has an excellent example of how to do this.
First, create the systemd unit. I think that placing it in the system directory and adding your specific User to the unit file will ensure that the process runs on boot without login, but as your user.
sudo nano /etc/systemd/system/mbsync.serviceAnd paste this text, making sure to change the user:
[Unit]
Description=Mailbox synchronization service

[Service]
Type=oneshot
User=<user>
ExecStart=/usr/bin/mbsync -Va
Then we need to make a timer file so that this Unit is called periodically.
sudo nano /etc/systemd/system/mbsync.timerAnd enter the following:
[Unit]
Description=Mailbox synchronization timer

[Timer]
OnBootSec=2m
OnUnitActiveSec=5m
Unit=mbsync.service

[Install]
WantedBy=timers.target
Now activate the new files.
sudo systemctl daemon-reload
sudo systemctl enable mbsync.timer
sudo systemctl start mbsync.timer
Great, so now we have successfully backed up our IMAP account into a Maildir directory and we have set up automatic fetching. For some, this might be adequate, but the next thing I wanted to do was to make sure I had an easy way to consume the mail. Ideally, I wanted it to be viewable in any mail app. Next, we have to install Dovecot which is an IMAP server.
Dovecot
Dovecot is another really powerful piece of software used at super high levels, and I don’t presume to be an expert with it, but I will show how it can be used in this situation as a local IMAP server.
So first, let’s get it installed:
sudo apt install dovecot-imapdNow we need to make some changes to the configuration.
sudo nano /etc/dovecot/conf.d/10-mail.confLocate the following line:
mail_location = mbox:~/mail:INBOX=/var/mail/%uComment it out and replace it with:
mail_location=maildir:~/Maildir:LAYOUT=fs:INBOX=~/Maildir/INBOXSave and close the file.
Next, open 10-auth.conf.
Replace
#disable_plaintext_auth = yeswith
disable_plaintext_auth = noThis will ensure you can connect to your server without SSL, but if you don’t want that option. You can skip it and keep plaintext authentication disabled.
Now open 15-mailboxes.conf.
Under “namespace inbox {“, add “inbox = yes” like so:
namespace inbox {
  inbox = yes
Go down farther and uncomment the blocks about the virtual “all” and “flagged” mailboxes so that it looks like this:
  # If you have a virtual "All messages" mailbox:
  mailbox virtual/All {
    special_use = \All
  #  comment = All my messages
  }

  # If you have a virtual "Flagged" mailbox:
  mailbox virtual/Flagged {
    special_use = \Flagged
  #  comment = All my flagged messages
  }
Start Dovecot.
sudo systemctl enable dovecot
sudo systemctl start dovecot
Dovecot is ready and your IMAP server should be functioning on your internal network, but without SSL. Since this is on your local network, that may or may not be adequate for you.
Viewing
Now if you use a mail app, you should be able to enter the IP address of your Mail Backup LXC in the server name and your Linux account credentials and your email will populate like any other server. For example, on my iPhone, I entered the following settings:
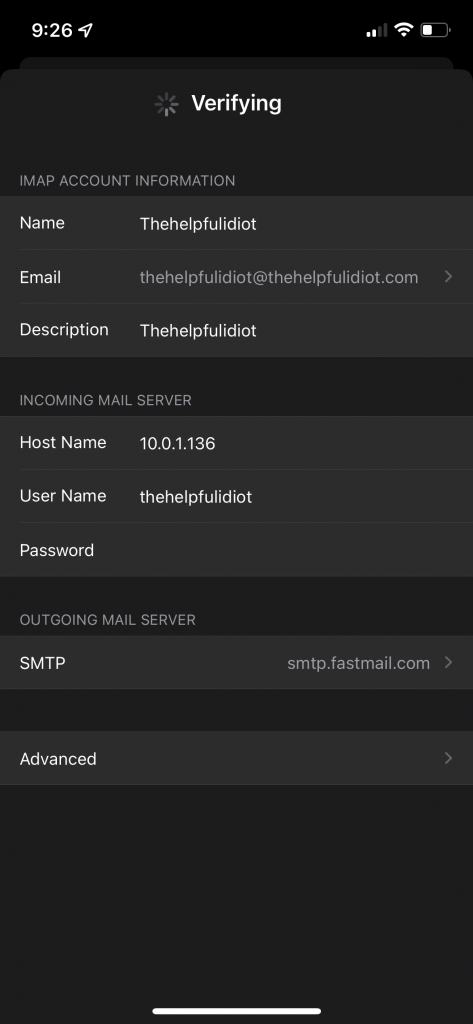
You can basically make the name, email, and descriptions what you would normally use for your remote email server. It will not be able to authenticate of course and you will then have an opportunity to create separate username, passwords, and server identities for IMAP and SMTP. The IMAP host name is your LXC’s IP address, the user name is your Linux username, and the password is your Linux password.
The SMTP configuration would be according to your remote server’s SMTP configuration to ensure you can send emails as ususal.
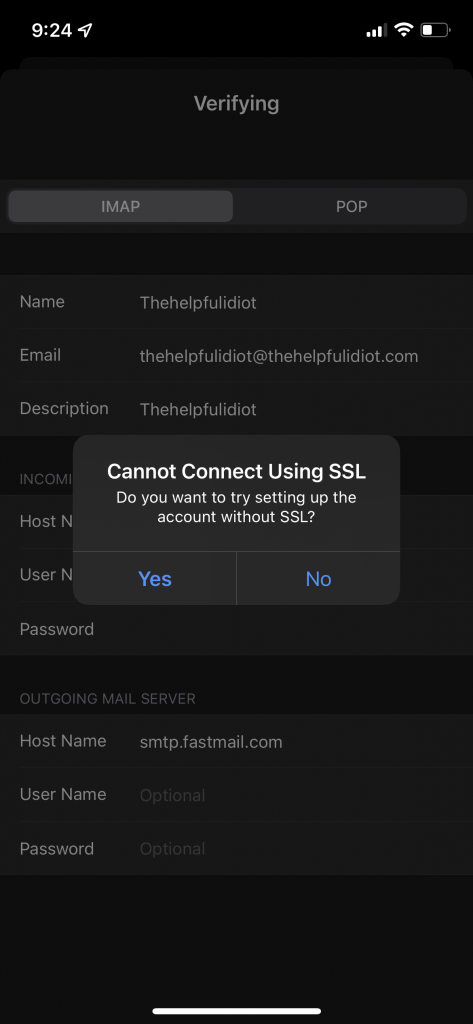
You’ll notice that attempting to connect from an iPhone (and I suspect from other systems) gives this warning:
I will continue in a second part on how to take things a bit further. I will show you how to install self-signed certificates, and how to set up a local webmail application called Roundcube to view your backed-up mailbox and send emails through your remote server.
Conclusion
I hope that helps some folks. It took me quite a while figuring out these settings, but now that I have, I think its pretty straightforward. Please feel free to let me know if you have any questions or if I got something wrong.
Thanks for reading!
3 thoughts on “Making an Automatic Email Backup – Part 1”
Comments are closed.