

UPDATE 10/15: READ IF YOU PLAN TO USE HUB WITH ZHA
UPDATE 10/18: READ IF YOU PLAN TO USE HUB WITH Zigbee2Tasmota
UPDATE 12/5: We’ve come full circle. The amazing developers of Tasmota have fixed the issue causing serial port disconnections to the zigbee radio with Tasmota 10. Now, the below instructions can be followed, without relying on the previous update posts from 10/15 and 10/18. The uploaded precompiled Tasmota firmware below has been updated to the newest version as of today.
Many of us have seen the Sonoff Zigbee Hub and how easy it is to flash to Tasmota thanks to many awesome videos and my personal favorite by DigiblurDIY. The device is amazing and works well, but some things like your Zigbee bridge shouldn’t rely on WiFi.
Recently, another amazing individual going by Tube has created a homemade Franken Zigbee router using an ESP32 board, ethernet, zigbee, and a 3D printed case. It comes preflashed with ESPHome and is instantly compatible with Home Assistant ZHA or Zigbee2MQTT. However, each one of these devices is being made by hand and supply cannot meet demand.
I came across another wired zigbee hub using an ESP32 – the EACHEN Zigbee Bridge Pro. For only $30, I thought I would give it a try. It shipped from China, but arrived fairly quickly after only a couple of weeks.
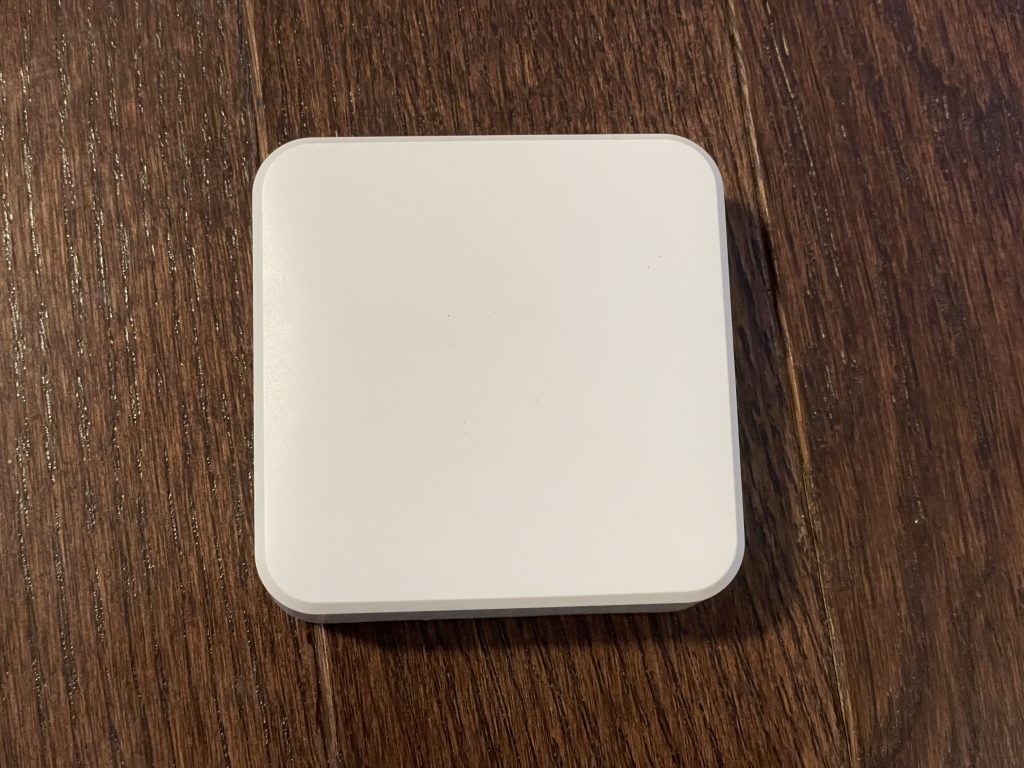
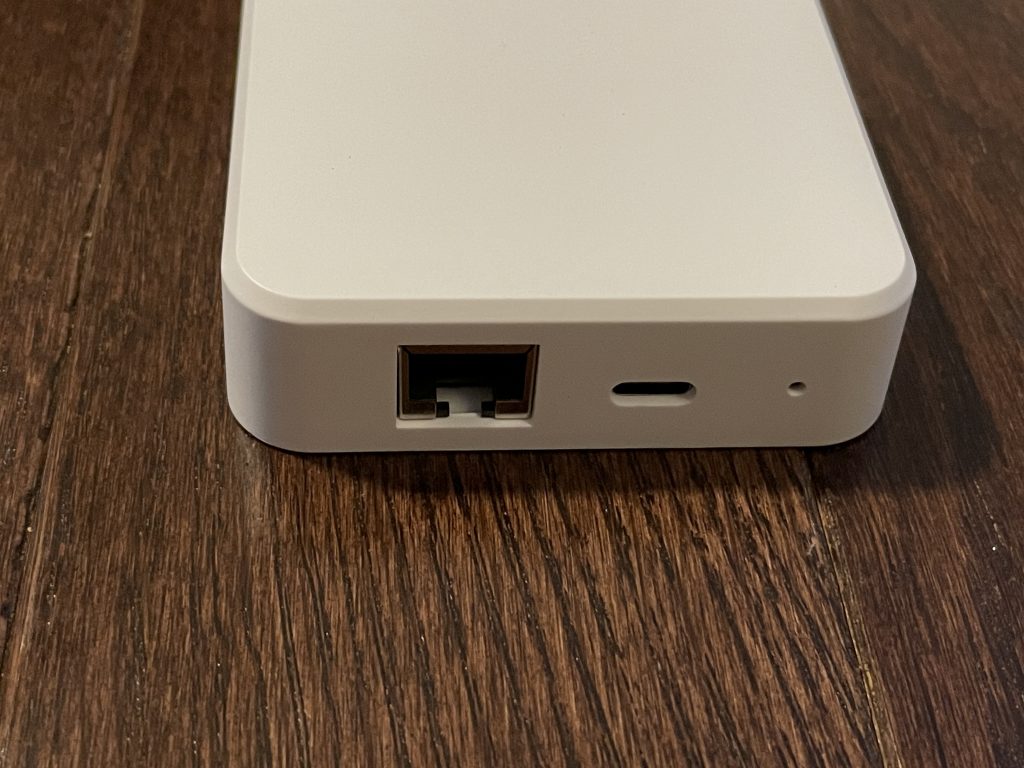
The device is probably the same size as the Sonoff Zigbee Router. It is easy enough to disassemble though since there are no screws and the bottom can simply be pried off.
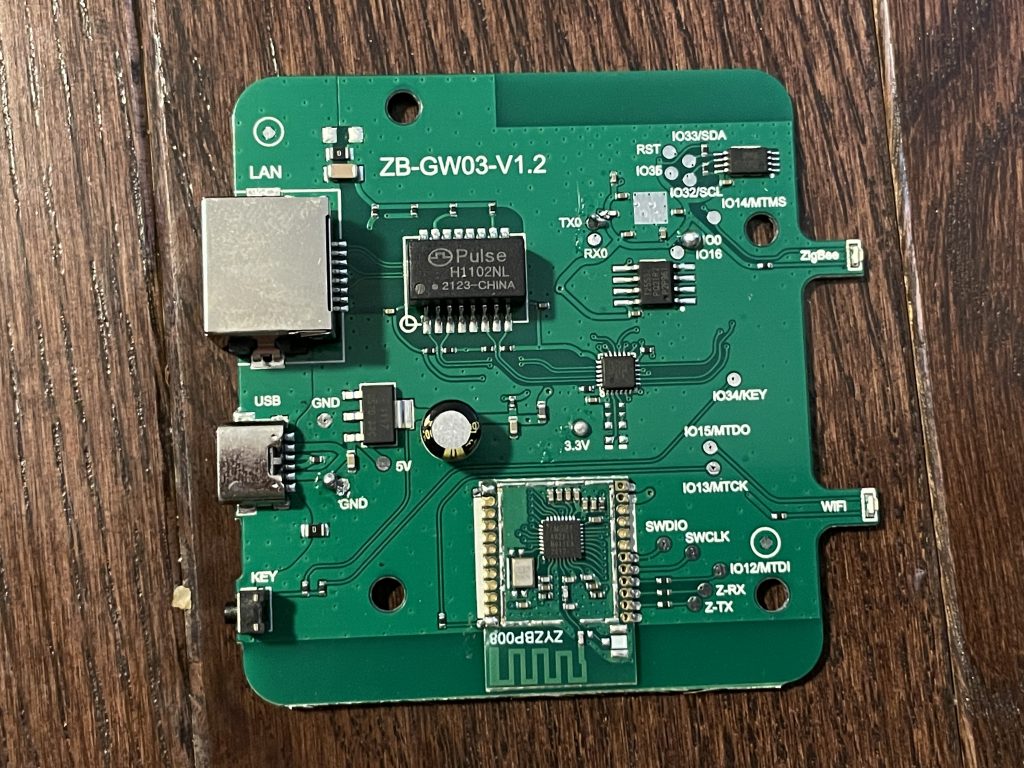
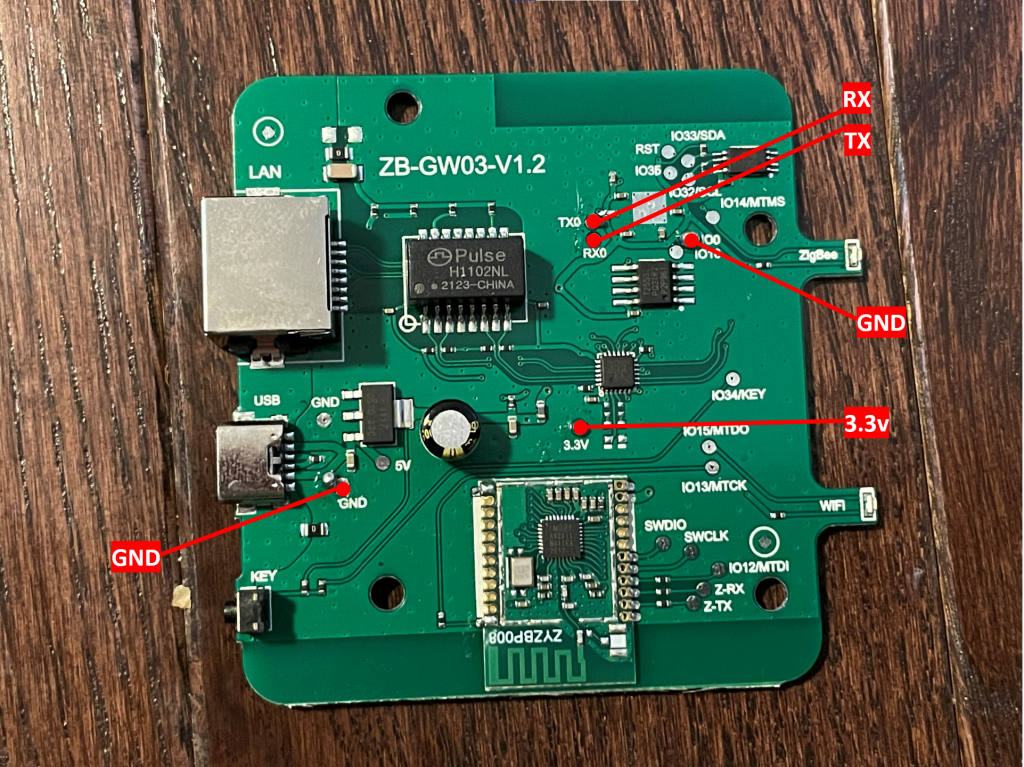
The board pops right out. It is now ripe for flashing and you can see some solder still on mine. My experience with Tasmota so far had been with mainly Tuya-convert and flashing the Sonoff Zigbee router which did not require soldering. This was my first time soldering and was way more fun than I expected.
Now before we get to soldering and flashing, we need to compile our own Tasmota firmware. We need to make sure Tasmota has access to the Ethernet port and the Zigbee Radio. As in all things Tasmota, Blakadder has a page devoted to this device and instructions. The instructions were excellent, but assumed a certain level of knowledge to compile the firmware. Having not done this before, this part took me the longest. The tasmota32-zigbeebridge precompiled firmware mentioned on the site did not provide ethernet access or else this process would have been a lot easier.
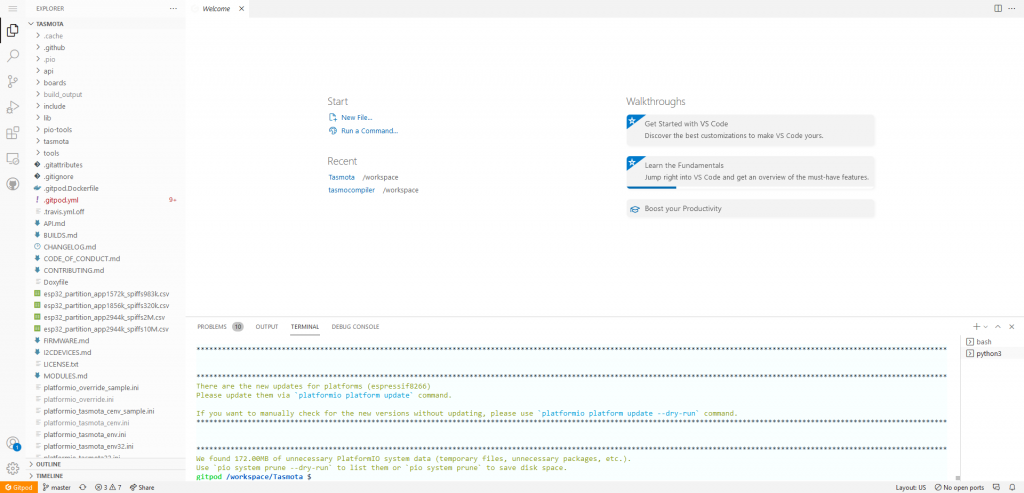
After much trial and error, the easiest way I found to compile this firmware was by going to GitPod. After you log in, you are taken to a VS code window prepopulated with the latest Tasmota build.
The instructions from Blakadder’s website say to edit two files- user_config_override.h and platform_override.ini.
‘Platform_override.ini’ is located in the root directory – /workspace/Tasmota. Open the file, scroll to the bottom, and add:
[env:tasmota32-EWELINK]
extends                 = env:tasmota32
board_build.f_cpu       = 240000000L
board_build.f_flash     = 40000000L
build_flags             = ${env:tasmota32_base.build_flags} -DFIRMWARE_EWELINK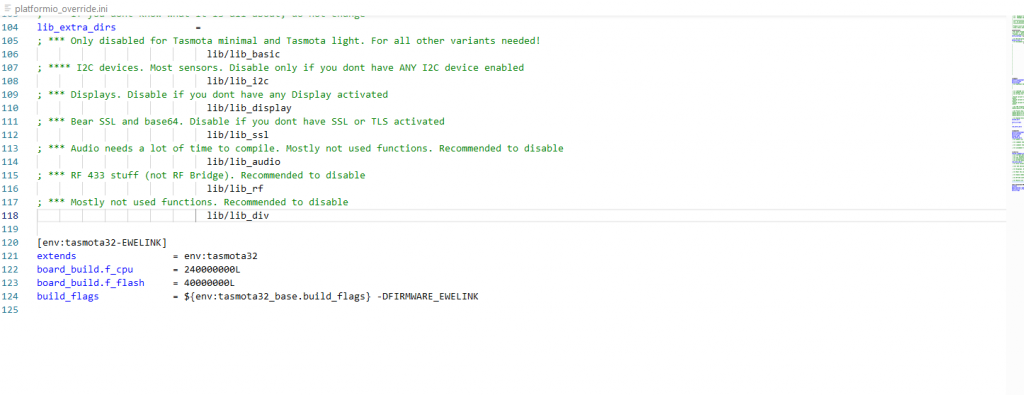
Now find the ‘user_config_override.h’ file which is located in the tasmota subdirectory (/workspace/Tasmota/tasmota). Open that file, erase all its contents and replace with:
#ifdef FIRMWARE_EWELINK
  #warning **** Build: FIRMWARE FOR EWELINK ZB-GW03-V1.2 ****

  #undef  SERIAL_LOG_LEVEL
  #define SERIAL_LOG_LEVEL LOG_LEVEL_NONE

  #define USE_ZIGBEE
  #undef  USE_ZIGBEE_ZNP
  #define USE_ZIGBEE_EZSP
  #define USE_UFILESYS
  #define USE_ZIGBEE_EEPROM // T24C512A
  #define USE_TCP_BRIDGE
  #undef  USE_ZIGBEE_CHANNEL
  #define USE_ZIGBEE_CHANNEL 11 // (11-26)

  #define USE_ETHERNET
  #undef  ETH_TYPE
  #define ETH_TYPE 0 // ETH_PHY_LAN8720
  #undef  ETH_CLKMODE
  #define ETH_CLKMODE 3 // ETH_CLOCK_GPIO17_OUT
  #undef  ETH_ADDRESS
  #define ETH_ADDRESS 1 // PHY1
#endif
Ok, so those two parts were relatively easy, but the next part on how to compile took me probably longer than it should have to figure it out. In the terminal at the bottom of the screen, while in the /workspace/Tasmota directory, type the following:
platformio run -e tasmota32-EWELINK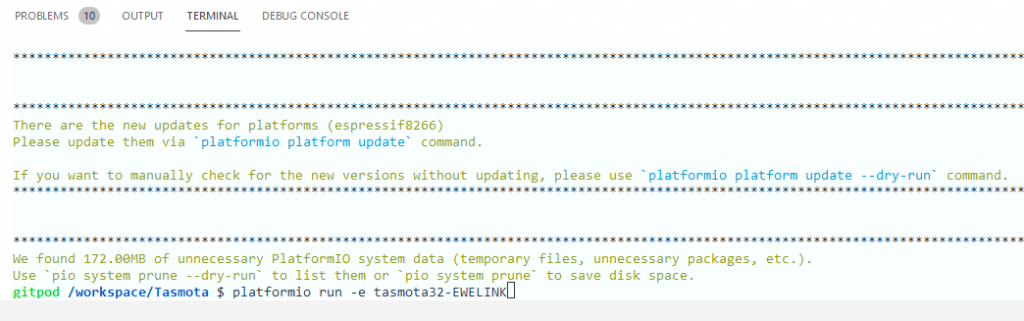
Now wait patiently for the new firmware to compile. Once it does, it can be found in /workspace/Tasmota/build_output/firmware. Download ‘tasmota32-EWELINK.bin.
I compiled this on 10/7/2021, Tasmota32 9.5.0. I promise that I did not tamper with it (and would not know how to tamper with it if I wanted), but you should probably not download firmware from some random guy on the internet.
This is Tasmota 10 firmware compiled 12/5/21 using the above method. It should work as intended without the previously described work-arounds.
NOTE: According to user erkoc who posted below, my new tasmota firmware based on v10 was still giving him the same issue with reboots losing connection to ZHA without manual intervention. He forked Tasmota32 and made sure the serial communication patch was included. He has instructions on how to compile your own or you can simply download his precompiled version.
https://github.com/vahempio/Tasmota-for-eWeLink
Ok, now that we have the firmware, it’s time to start flashing. Since we have an ESP32. I do not believe we can use Tasmotizer. I have Windows and used ESP-Flasher-Windows-x64. Open it up, choose your serial port, the firmware we just compiled.
Now the fun part with soldering. Below I have a photo of the ESP32 board and the corresponding connection on my Serial Adapter (I use this one).
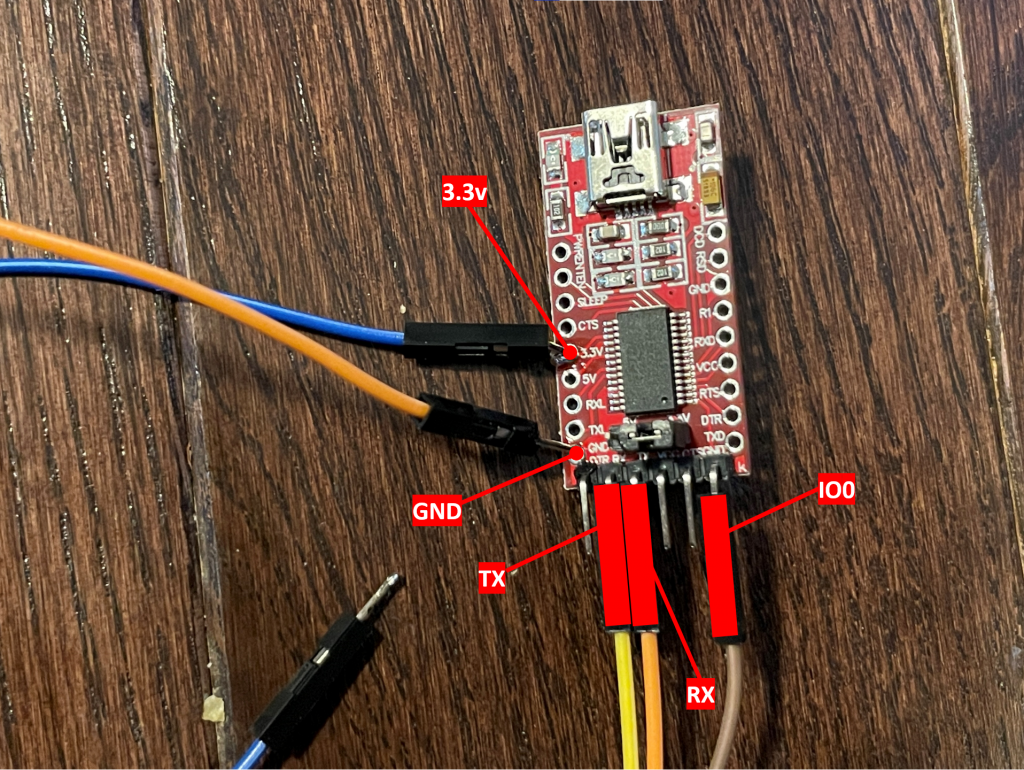
Now Flash.
Once you finish, it’s a matter of setting up Tasmota and a few more finishing touches.
Set up Tasmota through the access point first and add this Template by issuing the following command:
backlog Template {"NAME":"ZB-GW03-V1.2","GPIO":[0,0,3552,0,3584,0,0,0,5793,5792,320,544,5536,0,5600,0,0,0,0,5568,0,0,0,0,0,0,0,0,608,640,32,0,0,0,0,0],"FLAG":0,"BASE":1} ; module 0From this website, select ncp-uart-sw-6.7.8_115200.ota. Go to the upgrade firmware screen to update the zigbee radio. The device will automatically recognize this as firmware for the zigbee radio and will apply it accordingly.
Now try plugging the device in to Ethernet. I noticed it was sort of strange and took a couple reboots and unplugging and plugging the cable back in, but I saw messages about setting up the Eth connection in the console. There was no real way to change Ethernet settings like you can with WiFi, but I noticed two DHCP listings in my router. Once Ethernet is set up, you can disconnect WiFi with the following, but do not do the following until Ethernet is set up! Make sure the first command turning WiFi off works first before applying the subsequent rule which will disable it on each reboot. The first command by itself will not persist across reboots.
Wifi 0
backlog rule2 on system#boot do Wifi 0 endon ; rule2 1
If something went wrong and now you are locked out of the device because Ethernet isn’t working and WiFi is down, you can try Tasmota device recovery.
The device is now set up to use with Zigbee2Tasmota. For Home Assistant, there are a few more steps.
To integrate with Home Assistant, we must remap the Zigbee Tx and Zigbee Rx pins directly to TCP Tx and TCP Rx. This will disable Zigbee2Tasmota, but will allow the device to integrate with Home Assistant. Use the following command to update the template:
backlog template {"NAME":"ZHA-bridge","GPIO":[0,0,5472,0,5504,0,0,0,5793,5792,320,544,5536,0,5600,0,0,0,0,5568,0,0,0,0,0,0,0,0,608,640,32,0,0,0,0,0],"FLAG":0,"BASE":1} ; module 0Notice the change in the third and fifth positions. Afterwards, it will be possible to start the TCP Server which is what ZHA needs to connect to the coordinator.
Enter the following from the console to turn on the webserver for the Zigbee radio:
backlog rule1 on system#boot do TCPStart 8888 endon ; rule1 1 ; tcpstart 8888Finally, you can jump into Home Assistant and set up the device for ZHA exactly how it’s (masterfully) described by DigiBlur.
https://www.digiblur.com/2020/07/how-to-use-sonoff-zigbee-bridge-with.html
Thanks for reading. I hope this helps fill in the blanks for some folks like myself who are not as familiar with the inner workings of Tasmota. Please let me know if you have any questions.
Thanks to DigiBlur and Blakadder and all the other folks who did the hard work in getting this device to work.
Link to Purchase
Affiliate Link:
AliExpress.com Product – EACHEN EWeLink Zigbee Bridge Pro (Zbbridge Pro)
eWelink ZigBee 3.0 Smart Wired Wireless Gateway Hub
Non-Affiliate Link:
AliExpress.com Product – EACHEN EWeLink Zigbee Bridge Pro (Zbbridge Pro)
eWelink ZigBee 3.0 Smart Wired Wireless Gateway Hub
EACHEN Website:
EACHEN eWeLink Zigbee Bridge Pro (zbbridge pro)
CORRECTION 10/2: added steps to remap zigbee Tx and Rx to TCP.
CORRECTION 10/7: made changes based on feedback from /u/Vertigo722. Edited platformIO text. Changed some order of setup.
CORRECTION 10/14: see comments below. Hard rest of coordinator breaks connection with ZHA until toggled back to Z2T and then back again. Using this firmware and the rules below automatically toggle back and forth only on cut power. Hopefully this workaround fixes things for now.
UPDATE 10/15: READ IF YOU PLAN TO USE HUB WITH ZHA
UPDATE 10/18: READ IF YOU PLAN TO USE HUB WITH Zigbee2Tasmota
Thanks for the guide. Works perfect. There is a small error in the image of the ESP32 board: the IO0 pin has a label GND.
Glad you liked it! Actually, maybe it isn’t clear enough, but the labels on the ESP32 board are meant to show you what each pin should be connected to. I’ll see if I can update that to make a little more clear. Thanks for the feedback!
Hello,
Thank you for your guide. There is a problem. So if you make a power reboot, after does not work in ZHA. It will work again if you change the TCP RX and TX to Zigbee TX and RX and after change back to TCP Rx and TX. So every power reboot you should do this… 🙁
Hey thanks for bring this up. This was noticed by u/Vertigo722/ on Reddit and I confirmed it. The reason it took so long to detect though is because really, you can set and forget this thing. There really isn’t a need to power cycle it let alone unplug it from the wall and fortunately, when it is rebooted through software, it doesn’t have the disconnect issues as far as I could tell.
I have been working on a work around and I think I am really close. I finally (took a really long time) figured out how to preinstalled the two templates for Z2T and ZHA as modules in the compiled Tasmota. Later today I’m gonna work on setting up a rule where after only after a hard shutdown and reboot, the template will automatically change to Z2T and then after rebooting to change the template, will go back to ZHA. Hopefully should have this figured out later today and will get back to you.
Thanks!
Ok, I think I figured it out if you wanna try it. These rules and a new firmware should automatically toggle between ZHA and Z2T just after the poewr is pulled but not with software restarts.
I will post the new bin file above, and use the following rules:
backlog rule1 on system#boot do backlog wifi 0; TCPStart 8888 endon; rule1 on
backlog rule2 on Info3#RestartReason=Vbat power on reset do module 3 endon; rule2 on
backlog rule3 on ZbState#Message=Started do module 2 endon; rule3 on
Thank you for your fast solution! So I tried it but does not work. I flashed the new bin file and follow the steps. I would like to use it via wifi and I skipped the Ethernet part. Currently if I make a power reboot it cannot connect to my Wifi network. I don’t know what do I wrong…
Hey I changed the third rule. I think this should work better. Gives the zb radio a chance to reset. If you want WiFi, you would have to modify the first rule as the first rule turns off the WiFi now. Use this:
backlog rule1 on system#boot do TCPStart 8888 endon; rule1 on
If you already did the first rule, your WiFi will be disabled across reboots. You might need to temporarily plug it in to an Ethernet port to modify the rule and then you should be good to unplug it again. Otherwise, you might have to go through the tasmota reset procedure.
I ran in to the same problem. I opened a github issue:
https://github.com/arendst/Tasmota/issues/13350
Keep an eye on it, and perhaps it would be a good idea to post there just to confirm the issue.
Hi, thanks for the helpful explanation. I want to run the bridge with only zigbee2tasmota active; it works up to the point where I select “Zigbee Permit Join” – this causes the device to reboot.
In the ZHA mode it was possible to pair some sensors but ideally I want the bridge to function independently for redundancy reasons.
The log does not show anything upon selecting Zigbee Permit Join – any thoughts what causes the reboot?
Hmm I only played with zigbee2tasmota briefly on this device, but didn’t have an issue. I’ll play with it a bit more and see if I have any problems.
Which zigbee firmware are you running?
I updated to the version you suggested; is there any way (in the console?) to check?
With ZHA I can add devices without problems, once added through ZHA they can be seen in Z2Tasmota. I also tried to join devices by using a console command, same behavior, a complete reset of the bridge.
I noticed the same behavior. My experience with Zigbee2Tasmota had been with the Sonoff so to be honest I guess I had never tried it before.
I tried the 6.7.9 zigbee firmware and same result. I tried compiling a custom firmware with the development branch to see if it is a bug that has been corrected and now my device won’t start. Will have to solder it and flash again so will need to get back to you.
Good news. It works with the unofficial firmware from the Blakadder Repo.
https://10.0.0.132/update-2-a-wired-sonoff-zigbee-alternative
Ethernet not working for me, do you have any solution?
Hey which firmware are you using? One thing I noticed was that the ethernet didn’t work for me when I used a low power wall adapter. I saw the ethernet constantly connecting and disconnecting in the logs. It also took me a few times of turning it on and off and plugging and unplugging at one point to get it working. Not sure if you tried playing around with that part at all.
Something I just saw in the Home Assistant forum, since the Ethernet on the device is 10/100, if your device doesn’t automatically do it, you may need to set your router manually for 100mbps instead of 1gbps.
Hi there,
It’s awesome! BUT, when the hub restarts home assistant can’t connect to HUB.
Can you help me solve this problem?
Hi everyone, I bought this zigbee coordinator, and after some trials and error I finally came to this :
– I tried the tutorial on this page and on the page about the update for the ZHA workaround after power cycle restart. However both these solutions were not working correctly for me : Each time the device power cycle, my Blitzwolf SHP13 power socket needed to be re-appaired.
– So i find out that we don’t need to go to the Zigbee2Tasmota module then switch back to ZHA module : You simply need to follow the tutorial on this page, but instead of
backlog template {“NAME”:”ZHA-bridge”,”GPIO”:[0,0,5472,0,5504,0,0,0,5793,5792,320,544,5536,0,5600,0,0,0,0,5568,0,0,0,0,0,0,0,0,608,640,32,0,0,0,0,0],”FLAG”:0,”BASE”:1} ; module 0
You should use :
backlog template {“NAME”:”Zig_Bridge32″,”GPIO”:[1,1,5472,1,5504,1,1,1,5793,5792,320,544,5536,1,5600,1,0,1,1,5568,0,1,1,1,0,0,0,0,608,640,32,1,1,3552,3584,1],”FLAG”:0,”BASE”:1}; module 0;
The explaination is (i think, i am not sure) :
– In the ZHA-bridge template, there is no more Zigbee Tx and Zigbee Rx GPIO, so tasmota do not RESET the EZSP chip at boot, so in my Zig_Bridge32 template, I simply set Zigbee Rx and Zigbee Tx to some unused GPIOs, so that at boot, tasmota will do the EZSP chip reset, and thus work correctly. Of course the Zigbee2Tasmota UI will be here but not usable, however the TCP connection will be!
Zigbee2MQTT tip :In your Zigbee2MQTT config, you can add
availability:
active:
timeout: 1
so that if there is a reboot of the bridge, it will try to reconnect under 1 minute.
Hope it will help !
Hi,
Thank you for this wonderful work; it’s amazing!
I followed all steps (with the ‘new’ firmware of 12/5, aligned on Tasmota 10.0.0), and I have a succesful connection with ZHA (with zigbee device messages). If I perform a software reset on tasmota, everything reconnects. But if I perform an electrical power off/on, HA is in error (TCP connection ok + I can see it in Tasmota logs, but no Rx/Tx communication with the Zigbee chip).
The only way to retrieve a good situation is to apply the old template + reapply the ZHA template.
What can I do to fix this, or at least obtain information on the issue during a cold start?
Thanks a lot!
Hey sorry it took me so long to reply. The amount of spam on a wordpress site is incredible!
Anyway, I’m really surprised to hear that. That is exactly what was happening with the old firmware and the reason I compiled a new version of firmware and rules to automatically toggle between ZHA and zigbee2tasmota after a cold start. Supposedly, there was a problem with the serial communication in the 9.x Tasmota firmware but that was supposedly fixed. There is a discussion about it here:
https://github.com/arendst/Tasmota/issues/13350
However, just to point something out if you are tired of flashing Tasmota and messing around with this stuff, you really shouldn’t have to cut the power or even turn off the Zigbee Bridge at all once you have it set up. It’s the sort of thing that you turn on once and forget about it. The issue with a cold start may not be as severe as it seems since you really won’t be restarting or playing with the radio much at all.
Hey!
Thank you for your reply! The issue with the power supply is that I am in a place where power is not reliable, with a lot a short power off on the electrical network. Previously, all my domotic was based on several Raspberry’s but I am tired to managed SD card corruptions for instance (and micro-UPS are not easy to manage). That is why I migrate to autonomous systems.
Anyway, you inspired me (really!), and after reading the 13350 issue resolution, I decided to test it on my side: I took the lastest Tasmota release (v10.1.0) which includes the patch, I built it with your modification, and it works now! With the new firmware, the cold start has a successful reconnexion with ZHA, without manual action.
The whole project is here: https://github.com/vahempio/Tasmota-for-eWeLink
My Tasmota firmware is located here: https://github.com/vahempio/Tasmota-for-eWeLink/blob/ewelink-eth/bin/tasmota32-EWELINK.bin (but as you mentioned, you shouldn’t trust me ;))
And the diff (from v10.1.0 and the build) is here: https://github.com/vahempio/Tasmota-for-eWeLink/commit/452ee082294abb3751ca502308ddcece96787bf1
Perhaps one idea on why your firmware was not working with the patch: are you sure that the GitPod online compiler is taken the lastest git commit, and not only the lastest release?
Anyway, great job! 🙂
Hey this is really great. Thanks for sharing. I’m sure this will help a lot of people. Will link to your github farther up. Thanks!
I’m trying flash ZB-GW03-V1.3 but in logs I see same reset loop:
[15:13:08]00:00:00.003 HDW: ESP32-D0WDQ6-V3
[15:13:08]00:00:00.012 UFS: FlashFS mounted with 308 kB free
[15:13:09]00:00:00.045 CFG: Loaded from File, Count 1
[15:13:09]00:00:00.048 FRC: Some settings have been reset (9)
[15:13:09]00:00:00.103 BRY: Berry initialized, RAM used=3470
[15:13:09]00:00:00.112 Project tasmota – Tasmota Version 2022.01.2(ethernet)-2_0_2(2022-01-12T12:25:42)
[15:13:09]00:00:00.220 WIF: WifiManager active for 3 minutes
[15:13:09]
[15:13:09]Brownout detector was triggered
[15:13:09]
[15:13:09]ets Jul 29 2019 12:21:46
[15:13:09]
[15:13:09]rst:0xc (SW_CPU_RESET),boot:0x13 (SPI_FAST_FLASH_BOOT)
[15:13:09]configsip: 0, SPIWP:0xee
[15:13:09]clk_drv:0x00,q_drv:0x00,d_drv:0x00,cs0_drv:0x00,hd_drv:0x00,wp_drv:0x00
[15:13:09]mode:DOUT, clock div:2
[15:13:09]load:0x3fff0018,len:4
[15:13:09]load:0x3fff001c,len:1044
[15:13:09]load:0x40078000,len:10124
[15:13:09]load:0x40080400,len:5828
[15:13:09]entry 0x400806a8
[15:13:09]
[15:13:09]00:00:00.003 HDW: ESP32-D0WDQ6-V3
[15:13:09]00:00:00.012 UFS: FlashFS mounted with 308 kB free
[15:13:09]00:00:00.045 CFG: Loaded from File, Count 1
[15:13:09]00:00:00.048 FRC: Some settings have been reset (10)
[15:13:10]00:00:00.103 BRY: Berry initialized, RAM used=3470
[15:13:10]00:00:00.112 Project tasmota – Tasmota Version 2022.01.2(ethernet)-2_0_2(2022-01-12T12:25:42)
[15:13:10]00:00:00.220 WIF: WifiManager active for 3 minutes
[15:13:10]
[15:13:10]Brownout detector was triggered
[15:13:10]
[15:13:10]ets Jul 29 2019 12:21:46
[15:13:10]
[15:13:10]rst:0xc (SW_CPU_RESET),boot:0x13 (SPI_FAST_FLASH_BOOT)
[15:13:10]configsip: 0, SPIWP:0xee
[15:13:10]clk_drv:0x00,q_drv:0x00,d_drv:0x00,cs0_drv:0x00,hd_drv:0x00,wp_drv:0x00
[15:13:10]mode:DOUT, clock div:2
[15:13:10]load:0x3fff0018,len:4
[15:13:10]load:0x3fff001c,len:1044
[15:13:10]load:0x40078000,len:10124
[15:13:10]load:0x40080400,len:5828
[15:13:10]entry 0x400806a8
[15:13:10]
Serial port closed!
Hi,
After I flashed the hub for using with zigbee2mqtt in HA, every time when reboot the system every connection between the hub and devices became null, i mean the link quality before restart is 150 after that is “Null”. Why doing this?
I flashed this firmware: https://github.com/tasmota/install/raw/main/firmware/unofficial/tasmota32-zigbeebridge.bin